Welcome to Tree3’s AFK Arena Beginner’s Guide. Huge credit to him for creating this in-depth guide that covers all aspects of the game. The original guide post can be found here!
Table of Contents
Introduction
Hey everyone, Tree here. Little bit of an admission, this abomination I created is more like an entire novel rather than a simple guide. I’ll preface this by saying this will be a text-heavy guide along with taking some pictures from other previously made guides. The reason I am going down this path is that it is much easier to update text instead of editing pictures whenever a discussion pops up and contests a topic. My goal is to make this guide a one-stop-shop for all your questions. AFK Arena is a game with high variance. Variance in pulls, fights, experience, knowledge will all make a difference in how you play your account. I have tried to use the game’s in-game proper term for most things at least once, so searching with Ctrl+F should not be difficult. Why do this, there are guides elsewhere? Guides and graphics are quite often outdated in some parts or others and the main Googled websites are out of date still telling you Shemira is the way. I want to make a place that informs people about everything and is easily editable. The link to this guide will not change and I can edit the guide as I wish. I wanted to explain not just the what, but the why, as well.
I can’t force you to play a certain way, but there’s reason stuff is in guides, no? I want this guide to be able to cover actual routes that you can take up to the start of mid-game, not just simple tips and tricks, and cover some of the early mid-game choices, namely getting your signature items set up and initial furniture stuff, resulting in a truly comprehensive guide. Hopefully in the end, with enough feedback and revision, this guide can become a true compendium for new players. I wanted to make this guide with the new player’s experience fresh in my mind and compile and update a lot of the outdated information that is currently circulating and provide thorough reasoning for decisions to make in the game.
Lastly, if there are new strategies or questions and contingencies that you believe need to be in this guide then please let me know. My Discord is Tree3SL#0332 should you want to contact me about any errors or information. Special thank you to Nerds and Dartalan for helping me revise this book. I hope this guide is entertaining enough and will give you something to do and think about while you wait for AFK rewards. Thank you for taking your time to read this section, and enjoy the guide.
Whaling 101
Alrighty, let’s make this short and sweet. You want to spend money for pixels. Or support the developers. Or you think it’s worth it for what you’re going to get. This game is a marathon. You will not instantly buy every single thing possible in the game, go buy a house instead. Go buy your whole family a house.
That said, there are some quite enticing opportunities to spend money in the game. Some key purchases will keep you ahead of the pack, and those that don’t know what they’re doing with their money. These purchases are the standard for whales, and some of these are highly desirable to people that just want to buy a little bit here and there.
If you are just interested in spending a little bit once in a while and getting the most value out of your money, you’re better off doing items 1 – 2. If you’re ok with spending a little more than that and are sort of giving yourself a small monthly budget, then pick up items 3-4. A larger monthly budget would include all or some parts of item 5. If you are going to be a large spender, then pick up all of the things on this list, and then anything else is superfluous and up to you to decide. People who are going to buy things at higher amounts don’t really need me to tell them what to buy, and know what gives them value.
If you’re F2P then why are you in this section? Unless… ( ͡° ͜ʖ ͡°)
1.) $20 Advancement Rewards 1, 2, and 3
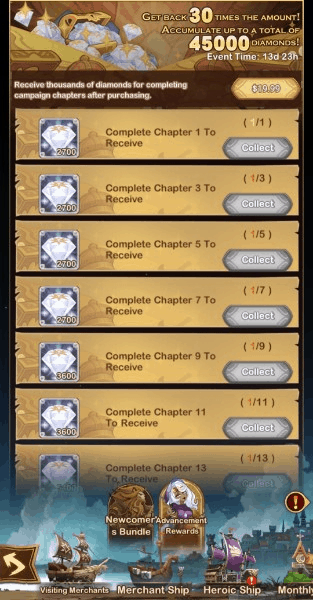
This is the game’s way to give you consistent diamonds and make you feel good about beating chapters and progressing in the campaign. You already get some heroes and faction scrolls in the Campaign Quests, but this deal here is by far the best one undisputed. You’ll get a significant boost in your box by picking this up. After you get the first one, there are 2 more sets of Advancement rewards you can get later in the game.
NOTE: The one in the beginning says you have X days to buy it. If it expires, you will NOT be able to buy the first set of Advancement Rewards and will have to wait until sets 2 and 3 when you are later in the game. The later sets do not have timers. Lastly, you have an unlimited amount of time to complete and progress in the campaign and collect on your purchase, the timer is only for buying it.
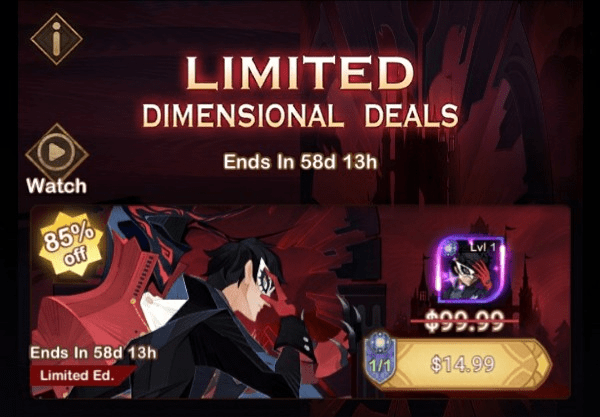
2.) $15 Dimensional/Limited Dimensional Deals
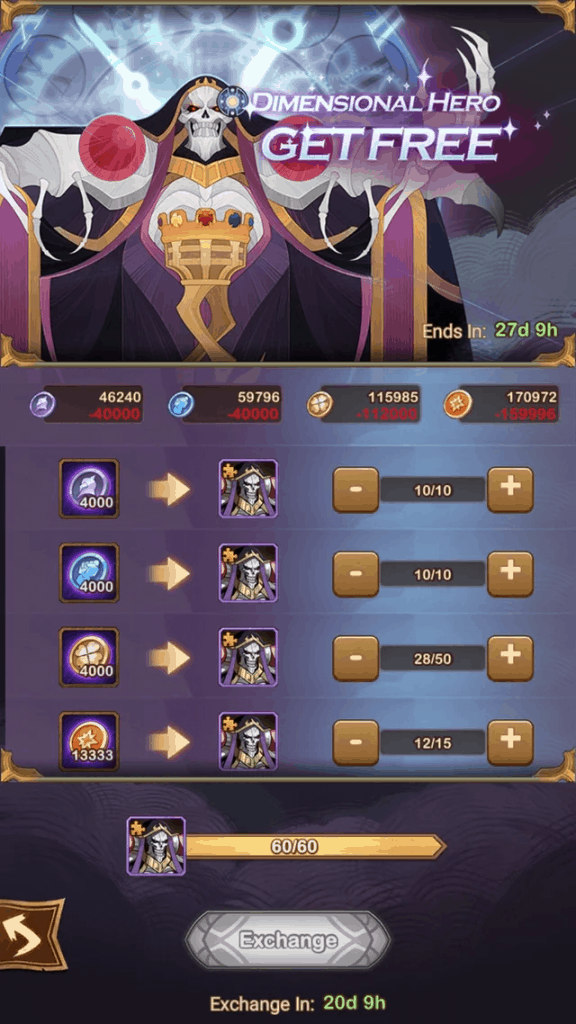
Did you come for a collab? You like this cool skeleton guy on the right? Too bad, if you don’t have him, you’ll never get him 🙂 Sadly, this is how the dimensional events work. They have yet to come back, for free or for a price. When they are gone, they’re gone forever (as of right now). Dimensionals are “normally priced” for $100 (hi Arthur), which is quite ludicrous. Lilith is currently releasing 2 dimensionals at the same time, and giving you 2 months to farm up the resources needed to exchange them. You will need these 2 months. The more you read and play this game, you’ll truly come to understand that the game is very very expensive to whale on blindly. If you’re joining midway through a collaboration, you’re in for a lot of work if you want to get even one of them. You are going to be essentially using a full month’s worth of each coin for 1 dimensional. Thus, at $15, halving all of the resources needed to save up and spend will allow you to instantly access one of the dimensional heroes early without waiting for the exchange in addition to accelerating your progress and allowing you to save for the next dimensionals or spend the coins for their normal purposes.
2.5.) $1 popup deals
Alrighty, pretty quick section. Early on in the game, you’ll get some purchases that only cost $0.99 for an elite stone or some diamonds and whatnot and they say 999% value or something. They’re a small purchase and a drop in the grand scheme of things but still solid value. You’re not missing much if you don’t get them. Just a little splash here if they pop up. Later the popup deals will cost more and more, and are not as great of deals.
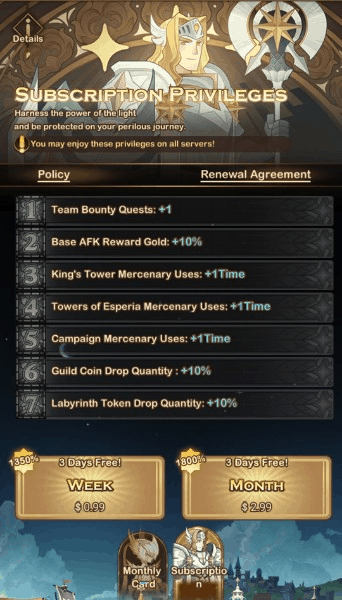
3.) Monthly Subscription
It might not seem like much, but the amount of perks you get for the money and the duration are well worth it. You get to boost yourself in your campaign through mercenary uses and other nice increases in currency.
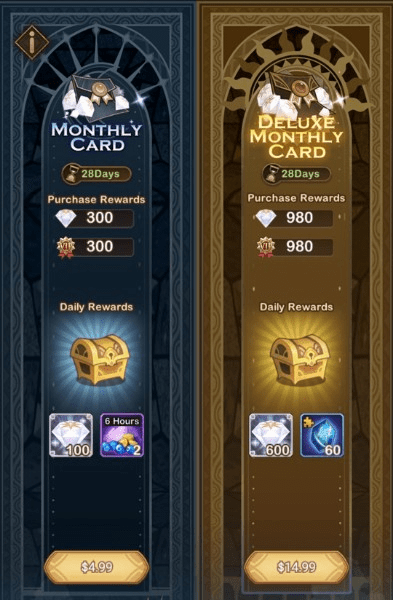
4.) Monthly Cards
There’s a small one and a big one. They’re both good and up to your monthly budget and login consistency. You get a little bonus in addition to the gems at different VIP levels. Don’t fret about which level you’re on, this purchase is still in this tier. Good diamond income, some nice bonuses, everything’s good. It should satisfy your pulling urges every couple of days.
5.) Noble Societies
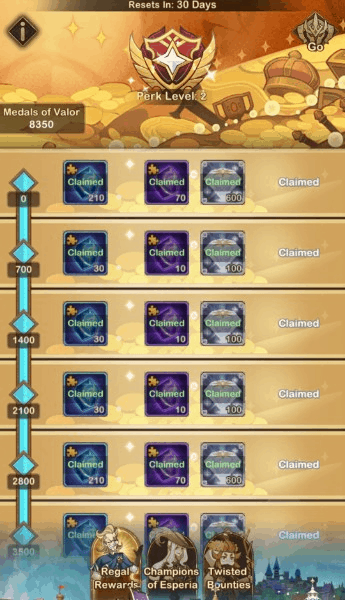
These are decent compared to like other purchases but the ones above this are cheaper and take the cake way before you go for these. Regal Rewards is the best one for newer players and drop off as you need fewer and fewer copies. Champions and Bounties allow you to switch their rewards before you start claiming them. For Champions of Esperia, either dust to help you get past those walls or red emblems are the best choice. Generally, the first 1-2 cycles dust will help you more since you’re still leveling up and getting capped through dust and don’t have high signature items or high ascension heroes. For Twisted Bounties, you should get EXP as it is always good. Twisted Essence is like meh at best and maybe better for larger spenders. POE coins are not a bad pick but probably only worth doing a couple of times.
6.) Honorable Mentions: Daily $1 Deal
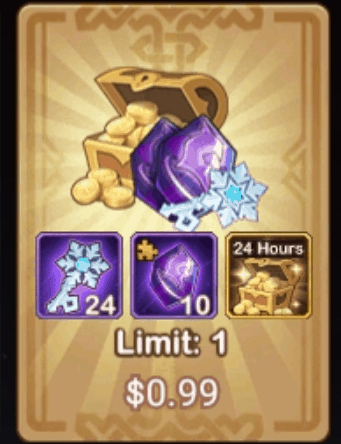
I’ll do a quick notable mention about the Daily Deal’s dollar option. Normally you don’t want them. However, during specific event times, you get some extra event currency by getting this deal every day. Usually, they’re not that great, but with these event times, sometimes getting an amount of these will allow you to get some extra red chests or a celestial/hypogean hero. Considering the fact that red chests are a very slow gain, and a copy of one of those heroes is valued at around 19000 gems, spending 1-14 dollars for that is worth it. You’ll have to do some math to figure out how many you need for every event, but guides are usually made by some nice people.
TLDR: If you’re f2p, you’re not buying anything. Whales buy all of these. Moderate spenders should always get the Advancement Rewards and $15 dimensionals. What more you do is up to you.
When Do Things Unlock?
We get a lot of questions as to when something unlocks and you’ll have to Google or ask someone, so I’m saving you time by putting that here.
| Feature | Requirement |
|---|---|
| Gear Enhancement | Complete Stage 1-1 |
| Ranhorn | Complete Stage 1-12 |
| Noble Tavern | Complete Stage 1-12 |
| Temple of Ascension | Complete Stage 1-12 |
| Barracks Store | Complete Stage 1-12 |
| Rickety Cart | Complete Stage 1-12 |
| Dark Forest | Complete Stage 2-4 |
| Arcane Labyrinth | Complete Stage 2-4 |
| Labyrinth Store | Complete Stage 2-4 |
| Store | Complete Stage 2-8 |
| King's Tower | Complete Stage 2-12 |
| Library | Complete Stage 2-16 |
| Battle Speed x2 | Complete Stage 2-16 or VIP 2 |
| Guild | Complete Stage 2-20 |
| Guild Store | Complete Stage 2-20 |
| Arena of Heroes | Complete Stage 2-28 |
| Progression Reward Purchases | Complete Stage 2-28 |
| Bounty Board | Complete Stage 3-12 |
| Fast Reward | Complete Stage 3-36 |
| Wishlist | Complete Stage 4-4 |
| Resonating Crystal | Complete Stage 4-36 |
| Wall of Legends | Complete Stage 4-36 |
| Legends' Challenger Tournament | Complete Stage 5-40 |
| Artifacts | Complete Stage 6-4 |
| Peaks of Time | Complete Stage 6-4 |
| Guild Grounds | Complete Stage 6-4 |
| Voyage of Wonders | Complete Stage 6-20 |
| Mercenaries | Complete Stage 6-40 |
| Bountiful Trials | Complete Stage 6-40 |
| Peaks of Time: Unrelenting Blaze | Complete Stage 7-4 |
| Peaks of Time: Secrets of the Forest | Complete Stage 8-4 |
| The Champions of Esperia | Complete Stage 8-20 |
| The Elder Tree | Complete Stage 8-40 |
| Twisted Essence | Complete Stage 8-40 |
| Peaks of Time: Rest in Piece | Complete Stage 9-4 |
| Legends' Challenger Tournament | Complete Stage 9-20 |
| Challenger Store | Complete Stage 9-20 |
| Arcane Labyrinth Hard Mode | Complete Stage 9-24 |
| Peaks of Time: The Ancient Ruins | Complete Stage 10-4 |
| Legendary+ Gear from Guild Store | Complete Stage 10-22 |
| Mythic Gear from Store | Complete Stage 10-22 |
| Peaks of Time: The Far Frontier | Complete Stage 11-4 |
| Legendary+ Gear from AFK Rewards | Complete Stage 11-18 |
| Field of Stars | Complete Stage 11-40 |
| Mythic Gear from Guild Store & Lab Merchant | Complete Stage 12-2 |
| Peaks of Time: The Divine Realm | Complete Stage 12-4 |
| Bounty Board Autofill | Complete Stage 12-40 or VIP 6 |
| The Twisted Realm | Complete Stage 12-40 |
| Peaks of Time: Rancid Forest | Complete Stage 13-4 |
| Artifact Enhancement | Complete Stage 13-40 |
| Peaks of Time: Viper's Marsh | Complete Stage 14-4 |
| Towers of Esperia | Complete Stage 14-40 |
| The Stargazer | Complete Chapter 15 or VIP 13 |
| Peaks of Time: The Dismal Descent | Complete Stage 15-4 |
| Abyssal Expedition | Complete Stage 15-40 |
| Peaks of Time: The Savage Wastes | Complete Stage 16-4 |
| Mythic Gear from AFK Rewards | Complete Stage 16-11 |
| Primordial Emblems from AFK Rewards | Complete Chapter 16 |
| Peaks of Time: The Solar Plane | Complete Stage 17-4 |
| Amplifying Emblems from AFK Rewards | Complete Chapter 17 |
| The Oak Inn | Complete Chapter 17 & 1 Ascended Hero |
| Peaks of Time: The Burning Woods | Complete Stage 18-4 |
| Faction Emblems from AFK Rewards | Complete Chapter 18 |
| Peaks of Time: The Abysmal Delves | Complete Stage 19-4 |
| Peaks of Time: The Contorted Realm | Complete Stage 20-4 |
| Wandering Balloon: The Depths of Time | Complete Stage 20-20 |
| Peaks of Time: The Forgotten Mine | Complete Stage 20-44 |
| Wandering Balloon: Fields of Stone | Complete Stage 20-50 |
| Mythic Tier 1 Gear Upgrades from AFK Rewards & Store | Complete Stage 21-1 |
| Wandering Balloon: Highburn Stronghold | Complete Stage 21-20 |
| Battle Speed x4 | Complete Chapter 21 or VIP 11 |
| Mythic Tier 2 Gear Upgrades | Complete Stage 26-1 |
| Dismal Labyrinth | Complete Chapter 26 and 30 Normal Lab Runs |
| Hero Choice Pack | 1 Ascended Hero |
| Guild Boss Quick Battle | VIP 6 |
| Arena Battle Skip | VIP 6 |
| VIP Exclusive Support | VIP 14 |
| VIP Exclusive Redemption Codes | VIP 14 |
| +1 Hero Choice Pack Draw | VIP 15 |
TLDR: The more you progress, the more stuff that unlocks. VIP levels sometimes let you get some nicer perks.
Heroes
As I’m sure you well know, heroes are like the little dude guys who actually do stuff for you. Ya know, they go pew pew and die for you on repeat. You want to get good ones, strengthen the right ones, and get stronger and progress in the game. Let’s go over the different tiers of heroes first. Also in case anyone’s wondering, your common heroes are your source for hero coins used in the Barracks or for dimensional exchanges. Turning on auto-retire is fine. We’re here to talk about REAL heroes. (Sorry Dreaf) Who’s good and when? What good compositions are there? That will be covered later, this is about how heroes themselves work. Level caps at each tier are: 100 for E, 120 E+, 140 L, 160 L+, 180 M, 200 M+, 240 at A.

Fodder
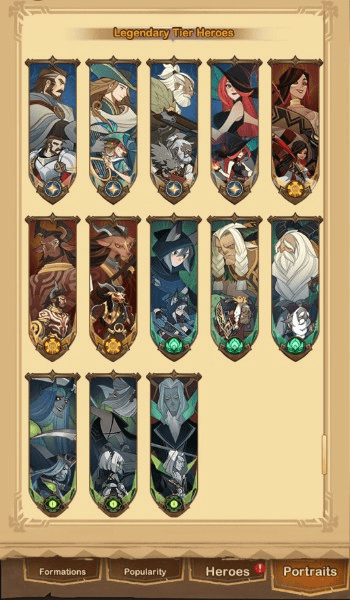
Fodder heroes, also known as Legendary Tier Heroes are the ones you pull and get at Blue or Rare as their base rarity. The reason we call them fodder is because we feed them to other heroes to tier them up. You’ll need a lot of fodder so don’t be sad when you get a million of them. Using Auto Ascend is always fine. These heroes are capped at Legendary+ rarity and level 160. You’ll be ascending five of these heroes and getting them to max level before you truly start working on any Ascended Tier Heroes. This means that they will also be used in battles! So who’s good right? Mirael and Saveas are the two most reliable ones. Saveas can be a little bit tankier with Mirael getting you that burst damage you need. Arden is amazing and gets much much better when his entanglement ability gets upgraded for control. Silvina is nice for the utility to get an initial stun off on a mage and make the enemies turn around, but Vedan and Niru can suit your early game tanking needs if you feel. Hogan is not a bad second pick for Lightbearers as a tank. As you can see there are 4 LB heroes but only 3 of the others meaning that you’ll statistically get more LB fodder than the other factions, resulting in your 5th L+ fodder to probably be LB. You’ll need 18 fodder to make one to Elite+, so waiting until you have 6 Rare+ of them will let you make one to E+. Waiting here is good because you’ll need 2 Elite copies of a fodder to make it E+, and Smart Ascend will only help you with this if you have 6 R+ copies and give you 2 copies of the same Elite fodder. Otherwise, you might end up with an Elite Mirael and an Elite Hogan and have to wait for more to get them to E+.
TLDR: You need fodder, save it until you have enough to take heroes to the tier you need them to be. Don’t feel bad about getting it from purple soulstones.
Ascended Tier Heroes

These are our heroes on our wishlist, the heroes we pull at Elite, or purple tier in the tavern. We call them A Tier heroes because A is for ascended and that’s how the alphabet works. They also have 4 abilities, not just 3 like fodder. You’ll get them from purple soulstones as well, but note you can get fodder at Elite tier from those soulstones. Don’t be sad if you do, you’ll need fodder anyway. How do we ascend these cool shiny heroes? We get our first copy, merge it with the second resulting in Elite+ (E+). We then feed it 2 E+ fodder units to get it to Legendary (L). Another E+ copy of our elite hero will get it to L+. This is a big breakpoint in terms of needing more copies of our A tier hero. We need to feed it an L+ fodder to get it to Mythic (M), and another to get it to M+. Finally, 2 final E+ copies of the hero will get our hero to Ascended (A). The sum of all this is 8 copies of our A tier hero, and 2 L+ and 2 E+ fodder, or a grand total of 180 fodder. Furthermore, feeding an E+ copy to a hero at A will grant them a star. They max out at 5 stars. Each star gives about 2.5% stats so its minute and you should be taking that hero off your wishlist after you get 8. Stars will come over time naturally and from purple soulstones as they do not take into account your wishlist.
Getting 4 copies of an A tier hero means it’s enough to get them to Mythic. Why is Mythic important? You get to unlock that hero’s signature item, granting them more stats, upgrading their abilities or giving them new effects. Some are better than others, and it’s quite a big investment to even bring a hero to M in terms of fodder. We’ll talk about good heroes to get up first for the purpose of Signature Items (SIs) later on in this guide. Once you Ascend your hero, they can be invited to the Oak Inn, and you can start using furniture for them, which will be explained later. Basically, more stats and abilities woo.
You might be going like “Wow I got 2 copies of a really cool A tier hero! Let me make them stronger by giving them a shiny gold border and taking them to L”. Hold up. If you don’t have 4 copies of that hero, they’ll be stuck at L until you pull enough down the line.
You’re feeding fodder to a hero that is roadblocked to random number generation (RNG) and going to hate yourself later. As I said before, you need every fodder you’re going to get, unless you’re spending tons to do pulls in which case you’re throwing money and hoping it compensates for your peanut sized brain.
The stats you get by taking a hero to L is minute and you’re feeding 36 rare heroes just to do that. If you still want to do it’s your game to play. Likewise, if you’re going to fodder an A tier hero to ascend another A tier hero, because you’ve heard they’re really cool or strong or OP or whatever, that’s also bad.
“But Mr. Tree Man, X hero sucks and I’m never going to use them.” Sure, you’re not going to use them right now, but keeping them has various benefits. You have increased hero diversity, you’ll need them to raise your resonating crystal cap later down the line, and there are other reasons that will tilt me if I have to keep explaining this to people. So all in all, don’t take a hero to L without being able to take them to L+, and don’t fodder A tier heroes unless whoever you’re feeding is already at 5 stars. The number of Ascended heroes you have determines your crystal cap, so you need more Ascended heroes, each A hero adds 5 levels to your crystal cap. In addition, they can serve as dimensional hero links which will be explained later. Here are the stat growth increases per ascension tier.
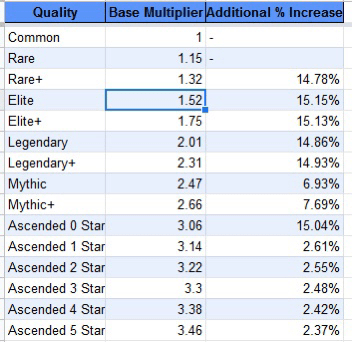
TLDR: Don’t ascend these heroes past E+ until you have 5 fodder heroes level 160. Especially don’t take them to L without L+ (4 copies) and M+ without A (all 8 copies). You’ll get more over time, don’t rush ascending for negligible stats. Trust me, they will only hinder more than help.
Celepogeans
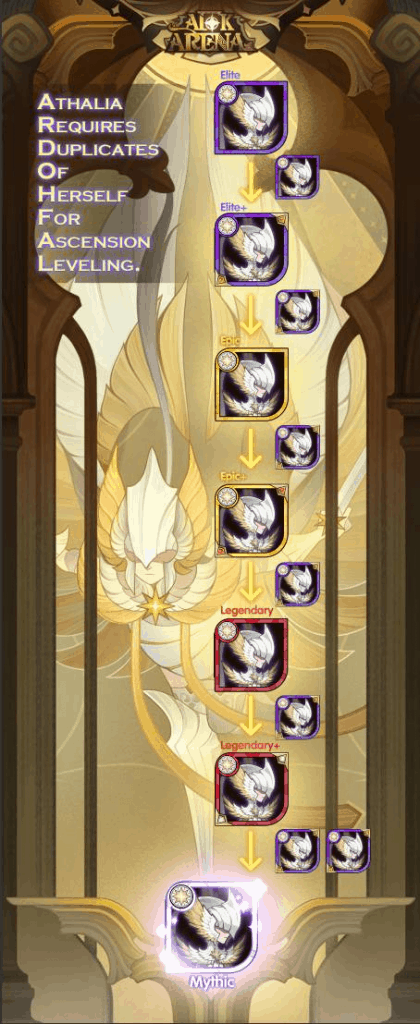
Celestials and Hypogeans, or celepogeans for short, are the rarest and most coveted heroes in the game. They are also very expensive and slow to ascend. You’ll essentially not be looking for these in normal pulls and elite soulstones. If you happen to get one, consider yourself very very lucky, and congratulations. The main way to get these is stargazing, which unlocks later, and will be covered later in the guide. They do not require fodder to ascend and you need 14 copies of them to get them to A, or 8 to get them to M and unlock their SI. Some heroes are a higher priority than others and some will be recommended to get to M and switch to another and whatnot and will be covered in the Stargazing section.
Some celepogeans are very good even at their first copy, and this is the order in which you should be looking to get them. You can get them from stargazing rarely or exchanging them sometimes in events. In events, it is generally better to get the red chests but sometimes getting your first copy of Twins, Talene, and Mehira is worth sacrificing chests for. Single copy of Celepogean order:
- First copy of Twins
- First copy of Talene
- First copy of Mehira
- Or 1.5 (up to you), 2nd copy of Twins
Dimensionals
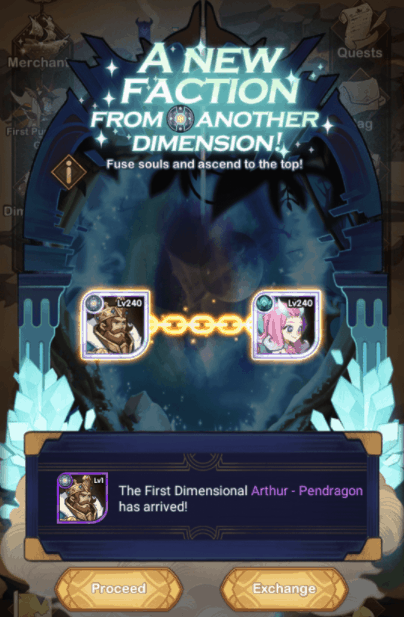
So these are the heroes that are limited time, with the exception of Arthur, who you buy in the Labyrinth Store. Arthur is a special case, and you need to buy him 4 times in the store to get all 60 shards to merge and summon him. He is not limited time and thus limited time dimensional exchanges are taking higher priority due to their uniqueness and time constraint. Exchanging for dimensional (dim) heroes requires a ton of resources and guides have been made for how many of each type of coin you need and how many labyrinth coins you can get for some of these exchanges.
Once you obtain them, you only need one copy. This is the most important thing, once you have a dimensional hero, you can link them to any of your heroes. They will copy the Ascension Tier and the level. The drawback? You can’t use them on the same team as the hero you linked them to. This goes for multi battles as well. You can’t link X to Y and use X on battle 1 and Y on battle 3. Thus, getting heroes to A later down the line to serve as heroes to link our dimensionals to is very important. You can always link some dimensional to high ascension hero earlier in the game to be able to use them, and then link them to someone else you don’t use as often once you ascend someone else you want to link them to. Unlinking a hero costs 100 diamonds and can be done by going to the Temple of Ascension and clicking on the Dimensional hero and then paying to use the unfuse feature. This is very cheap and good. It may seem like a waste of diamonds but it is not.
Let’s say you have Daimon carrying you, and he’s not doing so hot on some levels. Now you bought or exchanged for a Dimensional hero like Ainz Ooal Gown. Now you have 2 viable options as a carry if you linked them together. On another note, maybe you want to use them together and you can link your Dimensional hero to an L+ fodder to use both of your strong heroes early in the game, and unfuse them later. A really good trick is actually to link a dim hero to an L+ fodder, get some use out of the dim hero, and then you can feed the fodder to ascend some other A tier hero and it unlinks the dimensional hero for free. This is only really relevant to newer players as later game players will just have other heroes to link them to and have more options. As a new player, you’re going to try to allocate your resources optimally and work with what the game gives you.
Are these dimensional heroes worth it? Long story short, yes. They’re limited time, often have unique mechanics, and have strong synergy with various compositions. Sometimes they create new compositions that they are the core of, and if you miss out, you miss out forever. They add hero variety and expand the tools you have. Arthur and Wukong can come later, and if you pay $15 for one, easily one of the best deals in the game, you can still work on Arthur on the side.
For a full overview and a guide for one of the exchanges, please look at a guide by Whitesushi here.

TLDR: They’re worth it. They are limited time, and expensive, but they are unique and strong. They will expand your roster and are special tokens of how long you’ve played the game. Save up for them.
Tavern Time
The Tavern is where you get to do your gacha, your pulls, spend most of your diamonds, and most of your time screaming when you get a celepogean from normal pulls or get nothing from a gajillion scamgazer cards. Here’s what you should be doing. For anyone wondering, you cannot pull dimensional heroes, you must exchange them. The tavern is where you spend most of your diamonds early game as your goal is to do as many 10x summons (No single pulls with Diamonds) as possible. In terms of using the Factional Choice Cards (Those purple cards you get every 100 pulls), it is good to use them on LB in the hopes of Rowan, or otherwise, for the faction you are currently scrolling on or missing the most good heroes.
Your Wishlist
So there’s roughly a 0.2% chance that you’ll pull a celepogean from your pulls. It’s about 4.61% for an elite, and that’s 0.2% celepogean and the rest is your wishlist. If you don’t fill your wishlist you’ll just get a random elite hero in the pool, it does not make your other heroes’ chances higher. Also, NEVER WISHLIST FODDER. Even if you want, need, or are capped on fodder, this is essentially foddering an A tier hero with extra steps. It’s taking the place of whatever A tier hero you were going to get and you’re foddering it instantly. You’ll get fodder over time, don’t worry about it. Here’s a good starter wishlist which consists of essentially the top 5 heroes you want to start getting to A. If you would like a priority list of heroes broken down per faction, please check out this guide by Arty & Alpattex: Choosing Your Faction – Guide by Arty & Alpattex
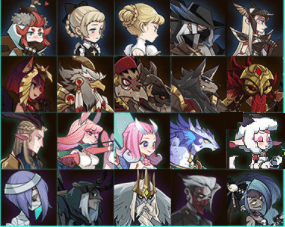
Some heroes are quite useful to even have at just Elite with 1 copy and thrown onto your Resonating Crystal. These heroes offer some utility and tools that you otherwise would not have. Please consider swapping out the rightmost hero on each faction’s list initially if you would like to obtain some tech single copies of the following heroes.

You may consider Izold instead of Silas or Nara until after 160. With the current meta skipping Shemira and Belinda, there’s a high risk that you don’t have copies, and having both Izold and Daimon gives you more carry options. However, past 160 and starting in midgame, Izold will need heavy investment (A, +30, 3/9) to really shine while Daimon is fantastic simply at M +20.
After you get 8 copies of a hero, take it off your wishlist. You do not need to get stars for them from your wishlist. It is better to expand your hero pool and make more heroes ready to get ascended. Stars will come with time, and stars can actually mess you up in certain cases (Example: Rosaline following a 5* Rowan instead of your Saurus that should be doing your guild boss damage). This also means that even if your purple elite soulstones give you enough copies to add stars to a hero, even Rowan, don’t put stars on them until you know what you are doing. After you have enough of most of the heroes in a faction, then you can throw whoever you want back on, but you’ll know what you’re doing at that point.
Normal Summons
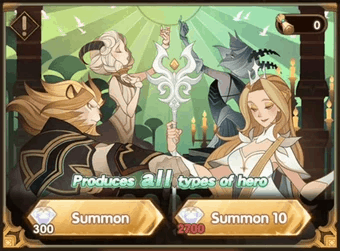
So this is basically where you summon all the time. The game does not do banners or rate ups like you might see in other gacha games. You spend most of your diamonds here. Only do pulls for 2700 diamonds for 10 pulls and never a single for 300 as it is cheaper. For using common scrolls, singles vs 10x pulls with them do not matter. There is a pity timer in the system for this banner, you are guaranteed to get 1 elite every 30 pulls. If you get an elite earlier, it will reset. Note that this timer will be separate from other banners. For example, 20 normal summons and 10 faction summons will not be a guaranteed elite. On average, you can expect an elite every ~22 pulls accounting for standard drop rates and pity timer. There is an amount of “pseudo elites” that you can get, which is basically your average of fodder and elite heroes, with fodders counting as 1/9th of an elite, which equates to about 1.0925 per multi pull.
Friendship Summons
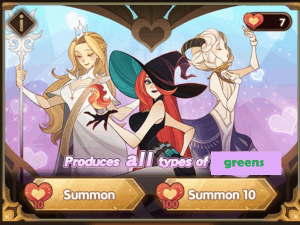
You should fill up your friend list whenever you can. In global chat people are always putting “Add Me” stickers. Get some friends IRL, on Discord, in your guild, or spam some stickers. You can get 20 Companion Points per day which lets you do 2 singles in this banner daily. It has worse rates than other banners and on top of that there is no pity timer, nor is there any difference when you do single pulls vs multis, so have fun every day. It’s a nice source of fodder and hero coins every day. Mild surprises are nice when you get an elite once in a while.
Faction Summons
So these rotate every day on reset time in a set order. It goes Lightbearer -> Mauler -> Wilder -> Graveborn -> LB. You can spend 300 diamonds to force it to switch to what you want but that’s just a waste of diamonds and you can wait you impatient rascal you. Generally scrolling for Graveborn is the way to go as they have the highest consistency of good heroes. If you get 4 copies of Daimon you’re in a super good place. Ferael will be used way later down the line and he’s amazing then. Nara is a great hooker for pulling someone in to CC them. Silas heals and buffs decently. Thoran will tank. Wilders is also a fantastic second option as they have Eironn, who is a great dodge and CC person later in the game and Tasi and Lyca who are amazing support units, and Saurus who is a great consistent damage dealer who is meta in most bosses. There is a pity timer in the system for this banner, you are guaranteed to get 1 elite every 30 pulls. If you get an elite earlier, it will reset. Note that this timer will be separate from other banners. For example, 20 normal summons and 10 faction summons will not be a guaranteed elite. You get faction scrolls by buying specific bundles, from other game modes, and events, Peaks of Time, Voyage of Wonders, and completing campaign chapters.
Hero Choice Pack (HCP)
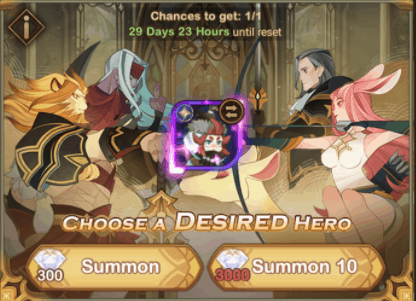
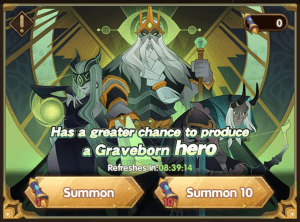
The Hero Choice Pack or HCP for short unlocks in the Field of Stars in the Library after you get your first Ascended hero. This means like all the way to A tier not your first like Belinda copy or some garbage like that lol. There is a pity timer in the system for this banner, you are guaranteed to get 1 elite every 30 pulls. If you get an elite earlier, it will reset. Note that this timer will be separate from other banners. For example, 20 normal summons and 10 faction summons will not be a guaranteed elite. The catch here is that every pull costs 300 diamonds and common scrolls don’t work for this. 10x pulls are the same as single pulls.
How this works is that you pick a “desired hero” (no it can’t be celepogean) and when you get an elite, it will deduct 1 count of your remaining monthly chances and it is GUARANTEED to be that hero. This is fantastic to get your 4th or 8th copies of the heroes you need. Your progress will greatly accelerate when you unlock this and your goal is to get to 1A and 5A as soon as possible. You get an additional HCP pick at 5 Ascended heroes, 10A, 20A, 30A, and 50A. A great strategy is to wait until closer to the reset, and see who you get from your normal summons before rushing into any decisions as to who to use your HCPs on. It will take time and experience to know when to wait and when to pop HCP. If you feel like your progress is just meh if you do it, don’t do it. For example, getting your 8th Rowan is a no brainer. However, you shouldn’t use like your 2 HCPs on Rowan if you have 4 of him. Going from 4 to 6 does literally nothing in terms of your team. Your HCP guarantees reset at the end of a monthly timer from when you unlock it.
Note, it is very beneficial to get to 5A within the reset timer of when you get your first ascended hero and unlock HCP. This is because the 1A will let you unlock HCP and your timer will tick down. The first HCP will help you get to 5A and getting 5A will get you your 2nd HCP in that same month-long period. Then your reset at the end of the timer will refresh 2 counts of HCP instead of just 1. Otherwise, if you’re slow with your account progression you’ll essentially be down one HCP compared to more optimized people. Again, this game is a marathon, and being optimal is the way to get the edge on people (or throwing money I guess).
Stargazing
Scamgazing is the fastest way to waste your money, diamonds, and progression. Ahem, sorry, let me start over. Stargazing is the main way you pull for celepogean heroes. It’s essentially a super expensive HCP that lets you pick celepogean heroes. You have a 2% chance of getting your chosen hero, which means that it is 1 in 50 pulls on average. There is no known pity timer for stargazing but some say it is 70, but this is not confirmed, and do not cry to me if you don’t get anything for what feels to be 99999999999 pulls :). Your first 10x pull has a very very high (not guaranteed) chance of containing your chosen hero. Obtaining your first copy of the Twins if not already obtained via other means is the priority. You’ll get some stargazing cards, which are essentially common scrolls but just for stargazing from events, game modes like Voyage of Wonders, faction towers, and buying them. These are fine to use as 1x and 10x don’t make a difference. Just make sure you set your chosen hero properly and you know what you’re looking for (Celepogeans only, gazing normal faction heroes is a horrible idea since there is just a cheaper version in the form of HCP and that trading a Celepogean for a normal faction hero on a 1;1 ratio is very bad value). .
Do not use diamonds for stargazing unless you’re very established in your hero roster. We are talking at 10A for whales, and 12-20A for most players. 16-20A for F2P, if you’re a light spender probably wait until like 12-16A. You want to have the main 3-5 best heroes ascended in each faction before you start stargazing. You do not get fodder and other elite heroes and hero coins by stargazing, which makes it really bad to help round out your box and also does not contribute to your saving of hero coins for dimensionals. It’s worth noting that there is a substantial portion of the community that recommends never diamond gazing for F2P and advocates the 4 faction + dimensional meta. Given the recent changes to the power cap, this meta is probably even more relevant for F2P than before. We value having more good heroes at high ascension to increase our crystal cap instead of focusing resources for a few celepogeans. This being said, you can get some celepogeans once in a while with the free pulls. As I said before, the first copies you want are 1-2 Twins, 1 Talene, 1 Mehira. After that, twins all the way to Ascended. Then you can do Talene or Lucretia. After that you do Mehira to M. Afterwards, Orthos and Zolrath are extremely prevalent in PVP (with some very strong PVE capabilities as well) while Alna slots into a lot of good compositions for PVE.
TLDR: Single pulls don’t matter for common scrolls, stargazing cards, friendship points, faction scrolls, or HCP summons. Only do 10x pulls with diamonds on the normal banner. Fill your wishlist. Swap out a hero on the wishlist when you get 8 copies of someone. Scroll GB or Wilders, you can switch around. Gaze for Twins. Don’t stargaze with diamonds until like 15-20A or even later.
Shops
In case you didn’t know, you can buy things in the shops. (ᵒ̤̑ ₀̑ ᵒ̤̑)wow!*✰ There are a bunch of them with good and bad purchases. You’ll be visiting some more than others. Here’s what you should do. Quick note, some of these currencies have max limits that you need to be aware of. Here’s the breakdown:
- Gold: 4,503,599,627,370,490 (No this is not a joke)
- Hero Coins 100,000
- Guild Coins 200,000
- Lab Coins 200,000
- Challenger Coins 500,000
(If you’re curious about the maximum of all the other currencies in the game, here it is: All Max Currencies)
The Store
I’ll explain further but take a look at this picture because it’s still correct.
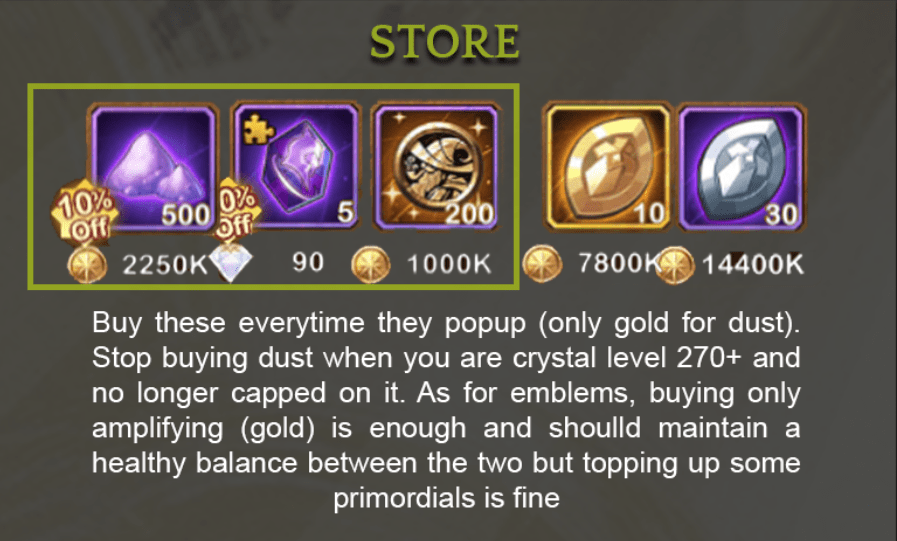
Ok thanks for looking at that picture, now go do that. “What the heck are those things on the right?” Those are emblems, used to upgrade SIs. You need a lot and they’re expensive. Buying too many makes you have no money and then makes you depressed so don’t do it. Buying the correct amounts makes you have solid SIs and stronger and happy. You gotta start chapter 18 to unlock silvers, 22 for golds, and then red ones start dropping super super super slow starting chapter 20. Red ones mostly come from events or gems so don’t worry about that. If you want to be competitive and plan to be/are a dolphin/whale then you can get the Hero EXP that shows up in the shop. Don’t buy gear for diamonds in the shop. The fodder card is also a bad deal.
Guild Store
Hey, hey you. Look at this again. K thx.
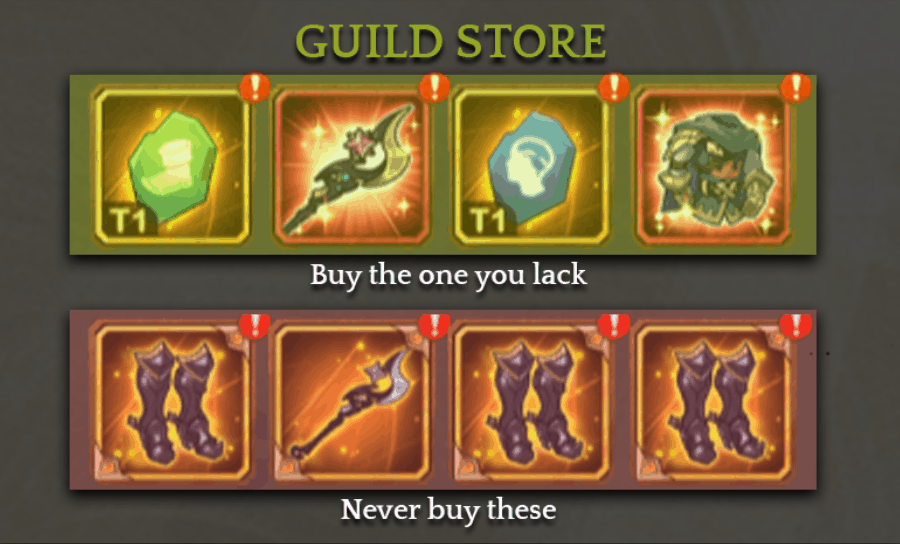
So what that cool picture that I didn’t make means is that you only buy gear upgrade stones or mythic gear in the guild store. Starting chapter 12-1 mythic gear starts showing up in the shop. Chapter 16-11 they start dropping from AFK. 21-1 is Tier 1 gear start (T1). 26-1 is Tier 2 gear start (T2). You’re essentially going to buy the gear for your carry, and then start going for your other main heroes that you use.
Gear in the guild store is factionless in the image when you buy it, but after you buy it there is an approximately 66% chance that it will gain a factional bonus. Once you are in chapter 23, you can get specific faction gear for an expensive price, but at chapter 32, the factional gear gets discounted to 30% off (With breakpoints before then making the gear 10% and 20% off). Wait until then to get factional gear, and stick to the traditional mythic gear or upgrade stones. Do NOT upgrade or enhance any gear that is below mythic, and even if it is mythic you only upgrade factional mythic gear. Now you might be wondering what parts to prioritize in terms of gear. You want to buy gear for your carry first, then core heroes that you have ready to use, then tanks and supports.
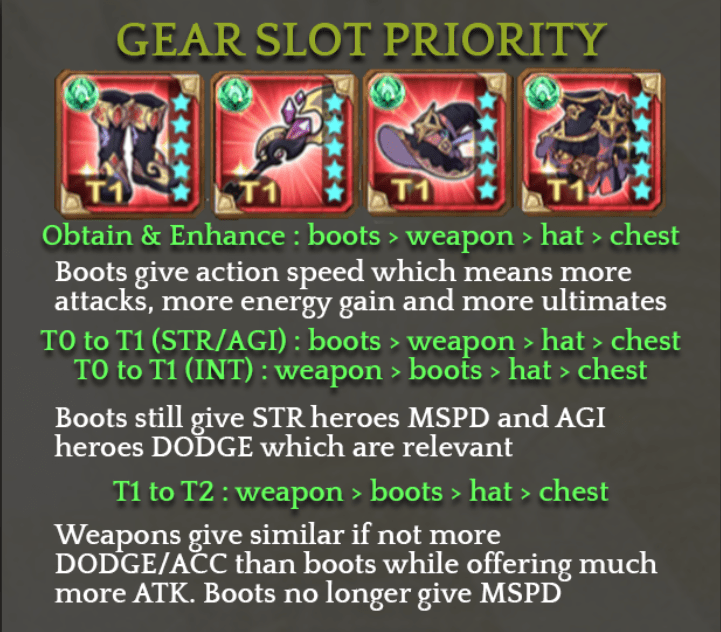
Here’s a picture. That should do ya. You get guild coins basically from doing guild hunts. If your team does more damage to hit higher thresholds in Wrizz/Soren hunts you get more coins. The Field of Stars has bonuses that basically let you get more guild coins after you reach a certain chapter. It’s safe to just always buy whatever mythic gear you need and it only takes about 10-14 days to get the 40,000 guild coins you need for one dimensional hero. Double it for 2 dims.
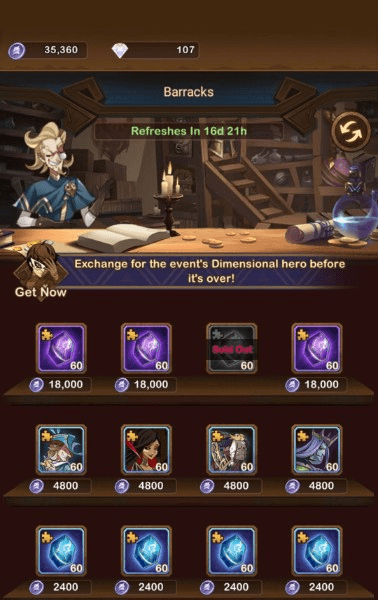
Barracks
You get hero coins from retiring common heroes at 160 a common. It’s a slow trickle so it takes a while to get enough to spend them. It costs 18,000 for an elite hero stone and that’s what you normally should get. However, if you want to exchange for dimensional heroes, it costs 40,000 per hero to max out the exchange for this currency. Due to the slow gain, you should essentially always be saving for dimensional exchanges here. Don’t even consider buying anything else in there. If you’re buying on dimensional for $15 so you’re like a small spender you might be able to squeeze in a couple of purple stones per dimensional cycle, but no rush, and better to be safe than sorry is always the case.
Labyrinth Store
The Labyrinth Store, or Lab Store for short is where you spend your coins that you get from beating the Arcane Labyrinth that resets every 48 hours. You get Labyrinth Coins (lab coins) as a reward for beating fights in the mode. Normally, you would go for Arthur as your first priority, and then Wukong and Dimensional Emblems as your second. However, again, you need lab coins to exchange for dimensionals. You get about 60 days to save lab coins and you will almost always hit the cap. Coins can stay for 1 week in your mailbox before they expire. You want to maximize your accumulation and storage for these as you might not always have enough hero coins to exchange. Dimensional emblems are cheaper and more worth it but the traditional red chests are mostly fine as well. It’s generally not good to get copies of normal factional heroes with these coins because they can be obtained on your wishlist or later through the Hero Choice Pack and save for the more coveted and exclusive purchases.

Arthur first, Wukong/Dimensional Emblems second, Technically dimensional exchanges would be priority 0 then.
Challenger Store
So this store unlocks when you start chapter 6 I believe and you beat people to increase the number of challenger coins per hour. You’ll average around 280-300 at the start and potentially more as people start dropping off and you get smarter and stronger. When you lose defenses you swap ranks with the player that beat you, and you beat people to go back up and maintain your coin income gain. It costs 250,000 for a copy of Ezizh/Athalia and 150,000 for Flora. You can pick between any of the celepogeans in the shop to build first, but regardless, you should pick up at least 1 copy of all of them regardless of who you choose to build.
Generally, people go for Ezizh because he has unique abilities and can lock out people’s ultimates, grant your team energy, and is used in Energy Cycle, which is a super expensive mostly celepogean composition for late game. Athalia is not bad to have to CC one enemy at the start of a fight and is used in Thoran Retaliation teams to move enemies in closer to Thoran. However, her main premise is PVP in the Arena. Flora is quite strong and good in slow stalling comps that stay alive very long with tanks like Thoran or Orthros while she can pepper the enemy with consistent damage and is also used in Thoran Retaliation teams for baiting enemy Tasi and finishing off Taint victims. With Flora being cheaper than Ezizh, some people opt to go for her after getting 1 or 2 copies of Ezizh. However, Flora is offered relatively often in events and hero choice chests so this store is the main way you’ll get Ezizh and Athalia. It’s best not to stargaze any of these heroes as these can trickle in over time. As I said, the game is a marathon, and in the long run, you’ll get Flora from a good amount of events and Ezizh/Athalia from coins slowly.
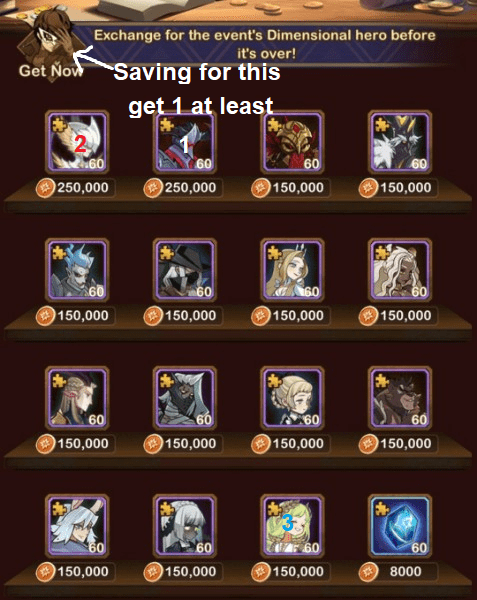
You might also need to use some of these coins to exchange for dimensional heroes. This is fine and sacrificing these heroes’ progress for limited time dimensionals is always worth it. That said, you want to spend these coins last in the exchange as few as possible as these coins are the most valuable currency you use in the exchange. For more go back up to my section on Dimensional heroes. Essentially, you save until the 500,000 coin cap, then if the dimensional exchange date is far off, you get a copy of whoever you’re farming then while saving your coins for the exchange. Here’s a picture I did for you guys because I’m awesome. After you finish those celepogeans, you can start getting emblems instead. It’s generally not good to get copies of normal factional heroes with these coins because they can be obtained on your wishlist or later through the Hero Choice Pack and save for the more coveted and exclusive purchases.
TLDR:
The Store: Get dust, POE coins, and 90 gem purple soulstones.
Guild Store: Only get mythic gear and upgrade stones. Wait until chapter 32 for factional gear.
Barracks: Save for dimensionals. Only get elite soulstones otherwise.
Lab Store: Save for dimensionals. In store priority is Arthur, then Wukong, then emblems.
Challenger Store: Get a copy of Ezizh, Athalia, then Flora, then build who you want, Ezizh is generally recommended.
Remember that limited time Dimensionals are priority number one before this however
Progression Guide
So this is actually where people look for real advice and have to think for themselves. I know, I’m sorry I can’t feed you literally everything. Sue me. I’ll do my best ok? On the bright side, I can help you with the beginning which is when you’ll be the most confused. Because some people don’t know, when we say “level” we mean hero levels, so if you’re capped at 100 then it means all your 5 heroes are level 100. We never mean account level unless we specifically state it, and that is next to never.
Levels 1-100
So you just started this game and you’re like “wat do?”. So the first thing you want to do after the tutorial is to go redeem all the active codes through this link: https://cdkey.lilith.com/www.afk.global
The list of all the codes is right here: AFK Arena Redemption Code List
Dump levels into Mirael until you unlock the Tavern, this is when you can use the goodies from the codes.
- Set up your wishlist
- Do your pulls
- While you pull, there will be a Facebook Share button in the bottom right. Click it and tap back (you don’t even need a FB account). Do it once more. This will let you get a free Wukong. (If you forgot to do this for whatever reason, here is a guide on a way to “Share” without needing to do summons: For those who can’t figure out how to “share”)
- Level Wukong until you can’t level him anymore.
- Level 4 other fodder heroes of different factions (preferably from the fodder recommendation list) until you can level Wukong more.
- Repeat until Wukong is level 100.
- Reset Wukong in the Rickety Cart for 20 diamonds.
You do not really need to put anything on your resonating crystal until after level 100 other than some support heroes.
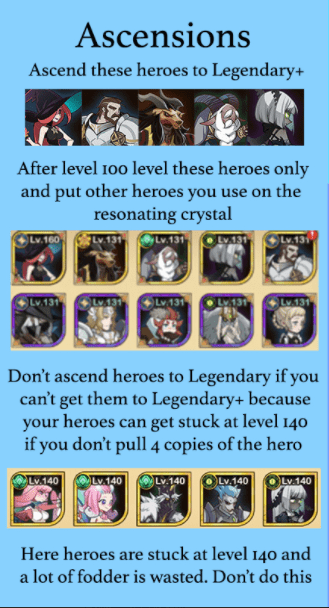
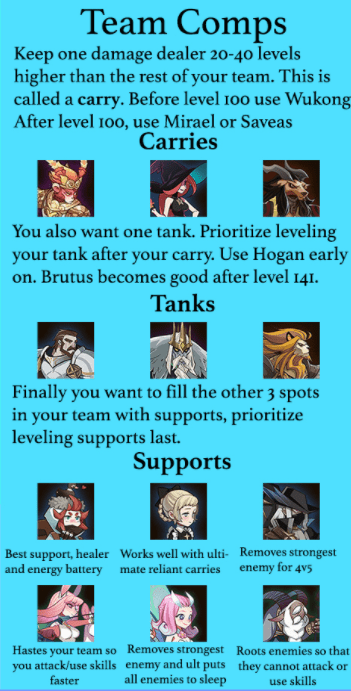
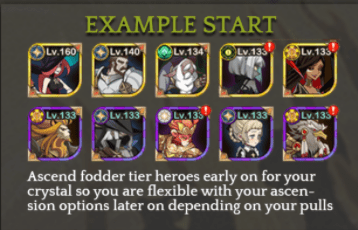
That should cover it for levels 1-100. Below is some more information by a wonderful fantastic Mr. Phoenix and other people that can help you if you like pictures and whatnot instead of reading like a boss. One last thing, don’t ascend A tier heroes past E+ until you have your 5 fodder at 160. This is when you can start making important decisions and find out the first few A tier heroes you’re going to focus on and make your carry.
TLDR: Wukong will carry you until level 100. Level him up with 4 other fodders and reset him once you’re there. Throw some A tier heroes into your crystal to play with them if you want.
Levels 100-160
This is the point in the game where fodder units are actually used in your comps instead of Wukong doing everything and are actually going to be your main units. Like I said before, the goal of this point in the game is to get 5 fodder to L+ to prepare themselves to be eaten by your A tier carries in the next section. At this point, you can start using some A tier heroes that you’ve pulled and throw them onto your resonating crystal to sub them in once in a while if you think they’re good. Look at the pictures above for some suggestions.
If you set up your wishlist properly those should all be some solid heroes to throw in for some fights. Keep your Mirael or Saveas carry a good 20-40 levels ahead of the rest of your fodder, and then bring them all up to 160 as you play daily and get gems and do your pulls. Arden is a fantastic addition for your team and one of the best and most accessible crowd control options for early game. For Wilders, he should be your first L+ fodder hands down.
You don’t need to worry about “who to ascend right now?” that we see asked very often in early game. Some people might suggest you ascend someone to L+ but this is really not needed because you’re just feeding fodder to people that you don’t have enough copies of once again. This is a plain and simple part of the game, and also the part of the game where players make a lot of mistakes due to impatience. You will get enough fodder. You will get enough hero Exp to get to 160. You will get more pulls later. You will get more copies of A tier heroes. Patience will let you make much more informed decisions once you’re capped at 160. An early ascension of an A tier hero to L (HUGE MISTAKE) or L+ will not make much of a difference stat-wise. They will perform just fine on the resonating crystal. The resonating crystal basically lets you get free levels on heroes, you put a hero in a slot and they match the lowest level of your 5 heroes you’re leveling. Big breakpoints are every 20 levels when skills are unlocked and upgraded. Your comp will probably be composed of Mirael, Saveas, Hogan, and Arden, mixed in and out with whatever E or E+ heroes you pull in the tavern.
TLDR: You’re making 5 fodder tier heroes to L+ and making them all level 160. Wait on ascending A tier heroes until you have more copies and are capped with the 5 fodder at 160.
Levels 161-240
This is the point in the game where fodder heroes are basically useless once you have your A tier heroes in mind that you will build. Arden is still rather useful due to his rooting ability, but everyone else basically drops off. In order to continue leveling, you will need to start Ascending A tier heroes. In order to get your levels higher, you’ll need at least 4 copies of the A tier hero you are choosing to build in each faction. You are essentially at a major crossroads here. You are going to pick 5 A tier heroes you are going to take to L+. Make sure you have enough copies (4+) of that hero otherwise they do not qualify. A general strategy is to pick the hero you have the most copies of in each faction. Notable exceptions that are 100% worth taking to L+ even if they are a couple of copies below the others (still need 4 copies) are Rowan and Daimon. Rowan at L+ will let you make him M by feeding your LB fodder that you made L+ and unlock his SI which is basically the best one in the game. Daimon at M also has a fantastic SI (get it to 20 as soon as you can if he’s your carry) and he will basically let you push super far into the campaign. After you make your first 5 heroes M, you can build up more L+ fodder to take them to M+, then you are waiting on enough copies to be pulled to take them to A.
The game is super simple if you already have 8 copies of a hero. You simply just ascend them. It’s reasonable to take a good hero to M if you have at least 6 copies of them, sometimes even 4 but generally not unless it’s someone whose SI is mandatory and of the highest priority. You would be able to pull the rest within a reasonable amount of time, finish them with your first HCP, use a hero choice chest on them, or get them from other means. The best thing to do here is to ascend as slowly as you can until you have 8 copies of a hero. It sucks having a hero stuck at M+ with 7 copies and having no way to get the last one but wait for pulls and luck.
Ideally what you should do is ascend slowly. You ascend the hero you have the most copies of, level them to max level, then repeat. This will let you ascend based on your exp gain. Waiting on exp is much more bearable and does not require RNG as compared to waiting on pulling more copies of a specific hero.
Get hero 1 to M (carry), then level them to 180, then heroes 2 and 3 to M (usually whatever you have the most copies of), and level those two to 180. Then hopefully the time the hero exp trickled in and you did more pulls you know who else to take to M.
Don’t take someone to M+ without being able to take them to A unless they are a core hero like Rowan or Daimon, or unless they are your carry. It takes 1 L+ fodder to take them from M to M+ and that fodder can be used to take another hero to M and have them be available for utility. You will need to understand where to focus your fodder. You’ll have like 7-10 heroes you’re considering and then you have to pick 5 to do first and then probably like 1 or 2 other subs to take to M while waiting for someone to get to 8 copies.
When you get 8 copies and unlock HCP, just be patient with it and wait until less than half of your HCP timer is left to decide. However, if you can ever use your HCP and the copy will be meaningful (For example the 8th copy of a hero you are working on), go ahead and do it.
Once you are at 5A, you will have a great understanding of what you are doing and be able to repeat the process much faster to get to 10A with your newfound knowledge, experience, and 2 HCPs a month.
Some heroes are better than others as carries. Some are better earlier (pre 200 – Belinda, Shemira). Some are good throughout (like Daimon). Some are good a little later (180+ Safiya). Some shine after 221 like Eironn, Gwynneth, Ferael. Who you use is up to the number of copies you have, and how you want to build your composition. Agility based carries are usually the ones you’ll see only pick up once you start getting matching T1 and T2 Mythic gear for things like Eironn and Ferael. This is not to say they don’t have use prior. They both do great but really shine at their full potential once you get them set up.
Make sure you are focusing your fodder and ascensions all centered around your carry and focus on building only one composition. Don’t spread out too many ideas, it will impede your progress. You want one team that can do its job for you, essentially you’ll have 2-3 heroes that will be in every team with some subs rotating in and out depending on what you need. You can start broadening your horizons after 5A and solidify your comp and make it as strong as you can level wise and get your SIs to the recommended levels and start preparing to make alternate teams with your HCP.
TLDR: You have a lot of options at this point in the game, but your first A and your 5A will essentially be driven by whoever you pull the most copies of. Save your HCP until closer to the reset so you know exactly who you need to pull for. After you get your first A, try to get 5A in the same HCP cycle for a bonus choice pick. Build one hero at a time per faction, don’t make a bunch of M heroes just to say you’re stronger.
The Dawn of Midgame
You’re essentially at Midgame when your crystal hits level 161. This means you got 5 A tier heroes to M and have a better grasp on the game. There are only a few new mechanics to worry about, but other than that, the game progresses a bit slower now. You will face a high level deficit and power rating deficit, and you will have to play a lot with your heroes and position them to get that one victory to progress in the campaign. Be prepared to retry a lot if you want to maximize your pushing.
Signature Items
Signature Items (SIs) unlock on a hero when you first take them to M. They give some stats, and also give certain effects at different points. You get a base effect when you unlock them, which we call +0. It is basically always fine to unlock someone’s SI that you use even once in a while as it gives them a good effect, some stats, and it’s dirt cheap anyway. After the initial unlock, you get new enhancements to the effect or additional effects at SI levels +10, +20, and +30.
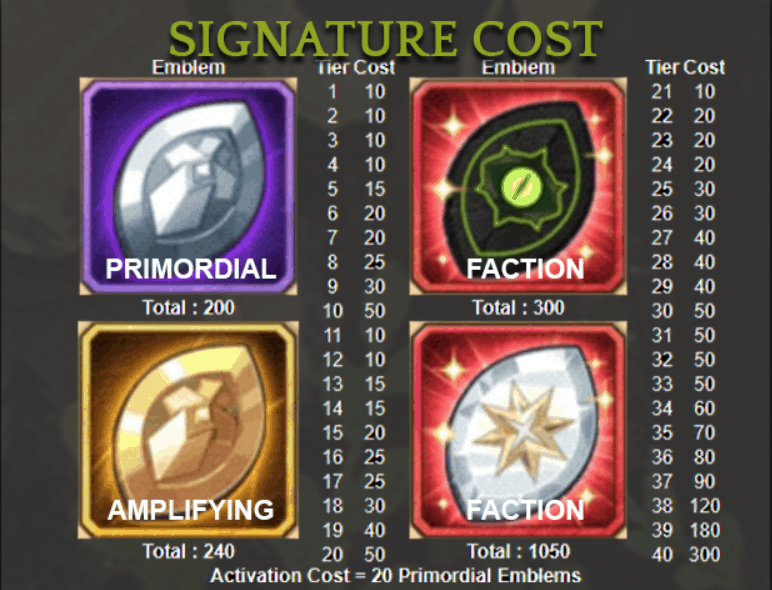
Don’t expect to get a lot of emblems once you start getting them from AFK rewards. Primordial Emblems (Silvers) will be used to take your SI from +0 to +10. Your main source of silvers will be from tavern pull rewards as well as when you buy them in The Store once in a while. That said, don’t +10 everyone even though it’s not that hard to recover from. Amplifying Emblems (Golds) be used to take your SI from +11 to +20. Your main source will also be from tavern pull rewards and when you buy them in The Store when they pop up. Factional Choice Chests or also known as red chests, and factional emblems are the most rare and slowly obtained emblem. They take your SIs from +21 to +30, and all the way to +40 to celepogeans (don’t go that far, +30 is fine). Your main source of these will generally be from events. When you are at this point in the game, you will basically always be picking red chests from events instead of getting your first copies of key celepogeans or rare cards like you did earlier in the game. You get a few more in other ways, like once in the tavern pull reward cycle.
They might all seem rare to you, and you might not exactly understand the weights of the values of each emblem type. Taking someone to +0 is next to no investment and is always safe. Taking someone to +10 is a rather light investment and not considered very costly. Taking someone to +20 is considered a considerable amount of investment. It takes much longer to get enough gold emblems to take someone to +20 compared to enough silvers to get someone to +10. Taking someone all the way to +30 is very high investment and you only do this if they are an important hero with a strong +30 effect. Here’s a graphic for how much it costs to level your SIs.
When you first hit 161 and start taking heroes to M, you’ll probably be always using those heroes in your teams, rotating some in and out. It’s safe to take all those first heroes that you took to M, and unlock their SIs to +0. It is also fine to +10 your carry, and 1-2 other heroes you use very frequently. If your carry is Belinda or Shemira, stop at +10.
Your first +20s will be done when you start using core heroes like Rowan or Eironn, or when you start switching out your early carries like Belinda and Shemira if you actually did them, for carries with more longevity, like Safiya, Eironn, Daimon, and the like. These are all good heroes to take to +20. I would do Daimon instantly to +20 if you managed to get him to M. He is that good, trust us.
Some heroes are fine to keep at +20, but some are very important to get to +30 activate their strongest effects from their SI. Taking someone here will take a considerable amount of time, which means you will only do this to key heroes that are used basically always from this point in the game. You do not take Daimon past +20 right now because you have other priorities. You will usually be saving your red chests to +30 the most important heroes when you get enough copies of them. The highest priority +30 is Rowan by a mile. Afterwards, Eironn, Saurus, and certain dimensionals like Ainz and Albedo are what you should do depending on what composition you are building. If you have Thoran or Izold ascended and are planning to use either of them as your main heroes, then you can consider them as well.
TLDR: All in all, everyone pulls different heroes, and boxes vary. Ask in the Discord and more experienced people will guide you for your specific situation. Just don’t be hasty and invest badly. +0 is fine. +10 your carry. Rowan +30 first. Ask around for the rest. Plan your SIs and it is always better to save emblems than spend them.
The Oak Inn
Welcome to the Oak Inn. It’s cool, it’s on a whale (which is why it was originally called “The Whale Inn”), and the rooms are fancy. You put a lot of hard work (or money) into getting your heroes all the way to A tier, and you can invite them to the Inn and get a room. Here, you can build furniture for your heroes and put them in their rooms to give them more stats. Furthermore, furniture has rarities, and Mythic rarity furniture grants more bonuses to the hero they are for akin to SI effects when you have 3 and 9 pieces. If you don’t fill your wishlist you’ll just get random furniture, it does not make your other heroes’ chances higher.
Invite in as many heroes as you can as you start with 20 free floors and can buy another 20 for 300 diamonds. When you first invite a hero to a room, the room is small and can only fit 3 pieces of furniture. 1 small, 1 medium and 1 large furniture can be placed per room. Each expansion adds another set of 3 furniture per room for every hero (+1 small, medium, and large furniture space). It takes 6 hours to get the first expansion, and 12 hours to get the last one. In the end, you can fit 9 furniture or 3 of each type into one room.
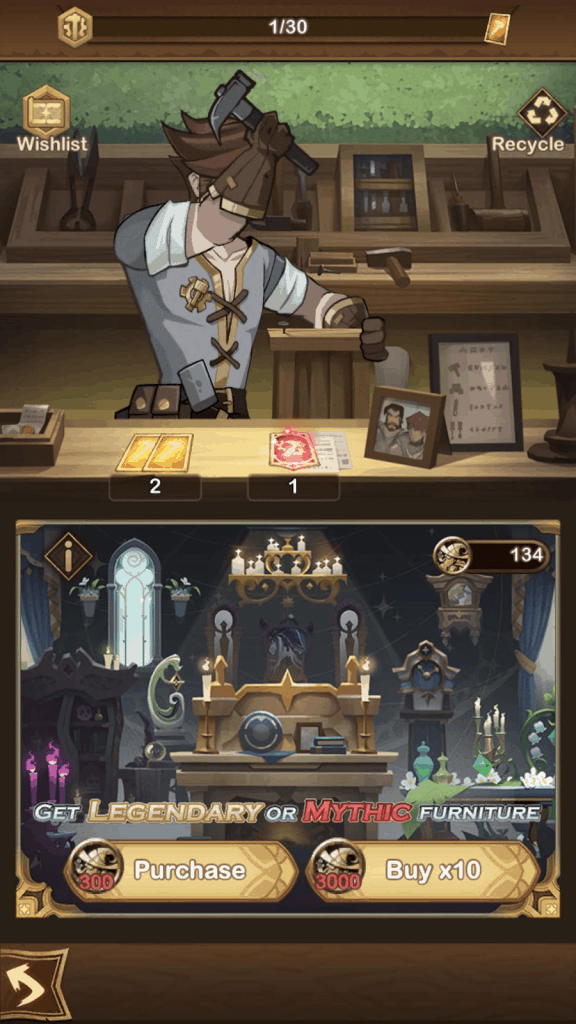
You can force Ulric to build furniture by spending POE coins in the Workshop. Your main source of POE coins will be trickling in from AFK rewards, some events, and Voyage of Wonders rewards like Misty Valley, and your daily purchase for gold in the Store. The Workshop has a wishlist where you can put 10 heroes like you sort of could wish list 5 of each faction in the Tavern. You should wishlist heroes you are planning to build here. There is a pity timer where you will get 1 Mythic furniture every 30 pulls. You also get some rewards for furniture cards where you can build specific furniture for heroes.
These are heroes that you don’t have at A but want to save Mythic furniture for, but you will definitely use them down the line. There are also heroes that have good 3 piece effects and good 9 piece effects. Getting someone to activate their 3 piece furniture effect means you have 3 pieces of their Mythic furniture. We call this the 3/9 effect and 9/9 effect if you have all 9.
Some heroes have good 3 pieces, and some have good 9 pieces, some have both. Getting someone to 3/9 is a moderate investment akin to a good amount more than +20 an SI. Getting someone to 9/9 is a high investment akin to +30 an SI. Statistically, when you get 7/9 for a hero, it is best to use your Mythic Furniture Cards to finish them off. If you are taking a hero to 9, take them off and use cards at 7 furniture total or if any 2 sizes have 3 furniture. Only use cards for 9/9, never 3/3. In terms of who is good, I’ll link a guide by Whitesushi here. Some good standard heroes to put on the wishlist are meta heroes with great furniture worth wishlisting before A to at least 3/3: Skriath, Izold, Lyca, Eironn, Tasi, Gwynneth, Ferael
TLDR: Put heroes on the wishlist that are close to A or ones that you know you will build, or you know have good furniture. It is fine to early wishlist heroes that you will want to 9/9 early on as it takes a long time to get that. As long as you wish list useful heroes that you will build, everything is simple here.
Frequently Asked Questions
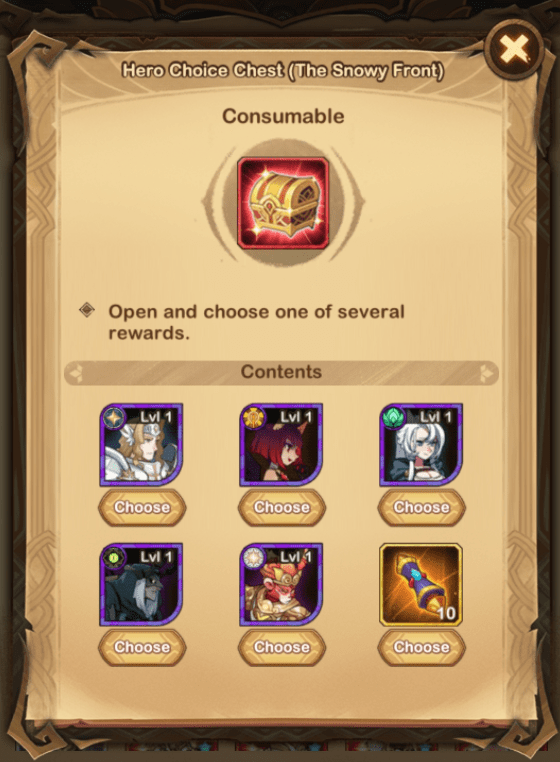
Q: I got this chest, who do I pick?
A: Generally speaking, if there is a celepogean hero in the chest, that one is the best value in terms of raw currency. However, people who do not have a late game box or even a solid mid game box will be better off saving the chest until they have 7 of a hero and pop the chest for the last copy. If the chest offers faction scrolls, never pick them as faction scrolls are the worst pick due to their sheer randomness and low value in general. If you were not considering saving it for 7 copies of a hero, you are much better off taking the celepoegan hero.
Q: You say red emblems are worth a lot from events, but I don’t see them from my reward options?
A: You begin to see them once you have a hero at Mythic.
Q: Can I leave my wishlist blank for more copies of the things I want?
A: No, you’ll get random stuff if you do that. Fill your wishlist entirely.
Q: I’m stuck, how do I progress right now?
A: Trying new teams and retrying for better RNG can do it at times, however, you must remember that this is an AFK game. Ultimately you will have to wait for resources. Trying to rush anything makes it take even longer to reach your goal.
Q: Should I spend diamonds on fast rewards?
A: Yes, but only starting at certain chapters. Once you are in chapter 16, do the one for 50 diamonds. Once you begin chapter 21, do the one for 80 as well. Once you are chapter 26, you may do up to two instances of the 100 diamond one. Prior to chapter 16, no.
Q: I need to make multiple teams for multi fights? When do those start?
A: Chapter 31-4
Q: Is this skin worth it?
A: The value of skins is subjective. Some people greatly care about skins, or are collectors, or just like some specific skins. Other people want to maximize leveling up their account. It is up to you to decide how much a skin is worth to you in terms of real money, event currency, or red chests, as these are usually what is sacrificed to get a skin. That said, you can only get a skin without paying real money during certain specific times but the other things can come to you over time. If you think skins are worth money, then buying them when they are at a discount with real money will be solid value as you will also be saving in game currency for red chests or a celepogean depending on the event by doing that purchase, not a bad “best of both worlds” deal.
Q: Dimensionals are so expensive, are they worth it? I might not be able to get both, maybe one, should I buy one?
A: Long story short, yes. They’re limited time, often have unique mechanics, and have strong synergy with various compositions. Sometimes they create new compositions that they are the core of, and if you miss out, you miss out forever. They add hero variety and expand the tools you have. Arthur and Wukong can come later, and if you pay $15 for one, easily one of the best deals in the game, you can still work on Arthur on the side. If you can only pick one then look at then ask about the strengths and weaknesses of each hero and decide for yourself, there is never an answer that fits all.
Q: How do Unions in the Library work?
A: You insert heroes into the unions which are provided by either yourself or your friends/guild members. Once a union is activated then the heroes represented in the union will have stat increases when you use them. The higher level the union is, the stronger the stat increase. It is advised to make each fodder unit L+ once at some point to activate their permanent union bonus. In order to activate the permanent effect of a hero in the Library, first make that hero L+, then visit the Library, then go into the union in which the unit belongs to, a prompt will then allow you to permanently activate its completion.
Q: What do I do with all my Instant Xp, Hero Essence, and Gold timers?
A: These timers give resources based off your campaign progression, thus not using them instantly is usually a good idea. Save all the Essence timers until you hit the infamous “Dust Wall” at around the 200s. Save all the Xp timers until the Xp wall at level 300+. You can be more free with the Gold timers but do still try to save them.
Looking for some free diamonds? Check out our AFK Arena codes page for a complete list of all gift codes.
And don’t forget to follow the official Facebook page for AFK Arena to keep up to date with all the latest news!
