

This is an in-depth starter guide to the concept of “Hero Cores”, made by aimb. It’s intended to be an alternative or supplement to the usual hero tier lists.
TLDR: Just look at the pretty pictures!!
Table of Contents
Design Philosophy
(super skippable)
Discussions of “the meta” are practically always doomed to unravel, and that’s not a bad thing. The real value of tier lists and other first-approximation analyses is in the debate that ensues. What players do in practice is virtually guaranteed to be several approximations behind “optimality” in part because optimality is unstable and not worth a monthly dissertation.
The proven paths provide stability in a game that, for all its simplicity, will always grow compoundingly complex with each change. The “core” analysis is meant to be an alternative way to navigate decision making and counterbalance some of the illusions created by “hero-centric” (tier lists) and “comp-centric” (replays/comp lists) analyses.
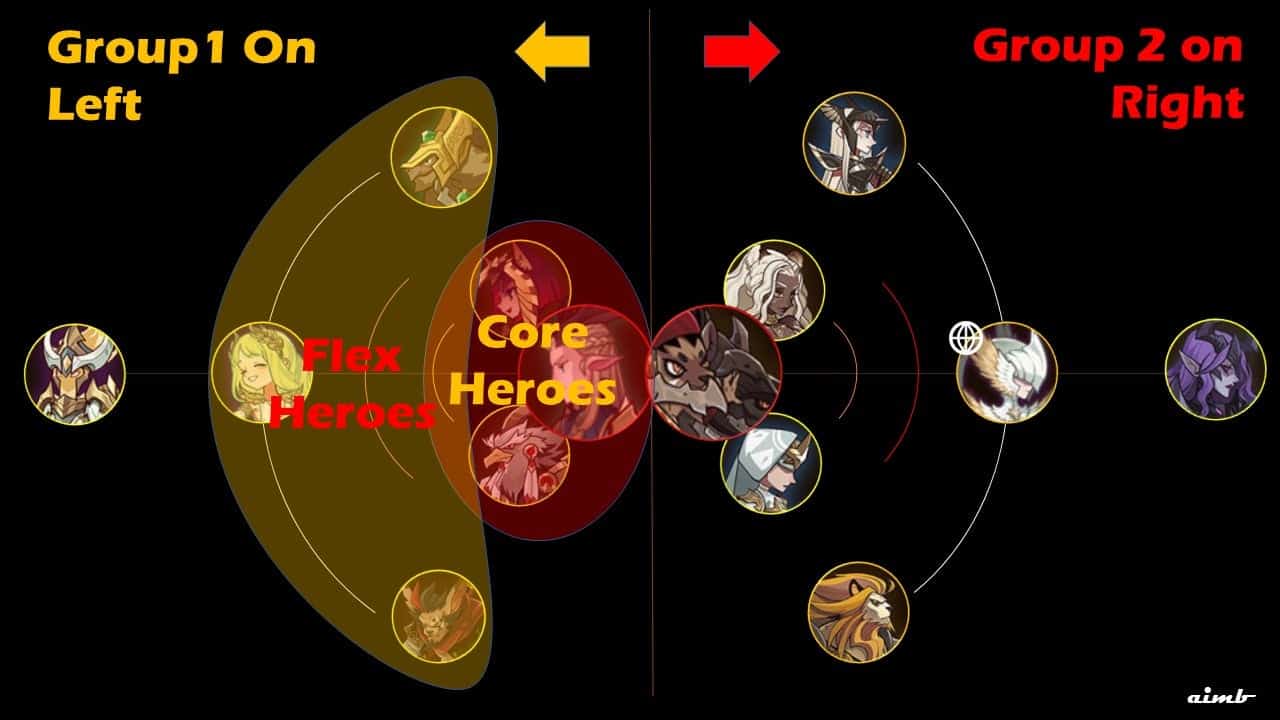
How to Navigate the Visual
“Core” here refers to function, namely working as a whole towards a specific “win condition.”
“Flex” here refers to heroes that capitalize on the strengths, compensate for weaknesses, or modify win conditions more directly.
I have created three sets of visuals, each divided into two groupings with their own unique cores and flex heroes. While each group could include more depth in its own visual, the sets of two are meant to show shared faction distributions as well as to compare similar win conditions and the logic behind them.
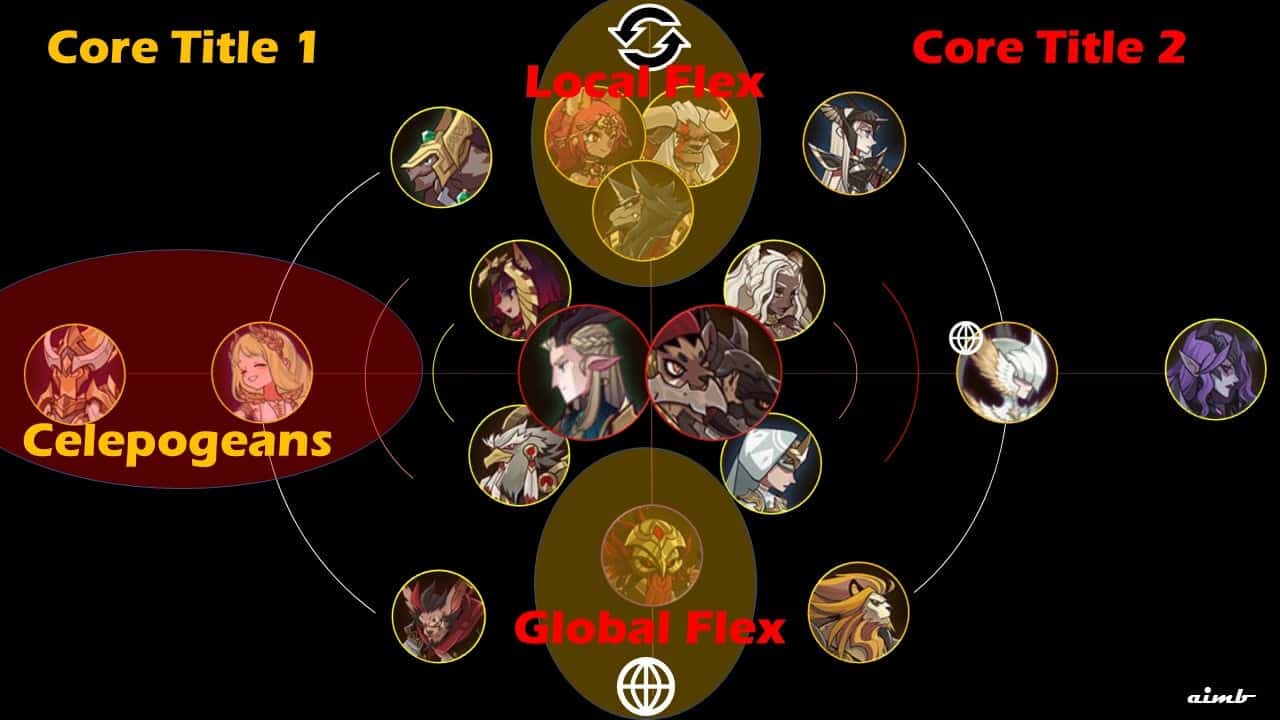
“Local Flex” heroes are those that are strong candidates for either core. “Global Flex” heroes are those that are notably strong for the set but should also be considered candidates to flex around other cores. Global flex heroes usually have unique and impactful mechanics that are worth mixing and matching, sometimes without regard for faction bonuses. Think of them as a global toolbox that are especially useful for troubleshooting difficulties, usually without costly tradeoffs elsewhere. Notably, one should not assume that core heroes are superior to flex heroes. Nor should one assume that these classifications bear any weight outside of the context of these arrangements. There are unlimited ways to slice this pie, and it is the very intention of this kind of analysis to promote a variety of perspectives.
The majority of my content is focused on 4F (4 Faction meta) which is, in general terms, the overarching strategy of investing diamonds primarily in the starting 4 factions for the majority of 5-team development for campaign. Without going into detail here, suffice it to say that the considerations presented assume one is not spending diamonds stargazing Celepogeans, though there is no intention to preclude doing so under certain circumstances or with certain budgets.
Despite this, the visuals contain Celepogeans to propose that they are better conceived as an extension of hero cores more than as alternatives to them.
The visual arrangement only loosely reflects two independent timelines from the middle-out. On the left, from Eironn to Orthos, there is a natural order to the development of the heroes, core first. However, the invade core on the right side is one of the few cores that has no smooth transition and is therefore not likely to be a consideration for most players until 4th, 5th or even alternative team options. One might choose to develop the team at the pace they get copies of Lucretia. I will be releasing a hero and furniture wishlist guide soon to help clarify questions of build order, as well as to help rethink wishlists as a flexible tool to build around what RNG gives you. Without this, I acknowledge that the perspective represented here is incomplete, and some key considerations will remain hidden until its release. However, I will also make the claim that wishlist guides and tier lists are also incomplete without the functional component this format is intended to provide.
Note to Guide Makers
For those interested in using this kind of format, just remember that the visuals are functional first around win conditions, always held within the context of the fuller sets of team cores, and are arranged to loosely reflect the interaction between investments over time, and functional value when developed. It is not my wish to constrain visual creativity, but there is only so much information you can pack in a 2D space, and the primacy of a core-function perspective is the main thing to “standardize.” At some point in the near future, I hope to speak with guide makers, current and aspiring, about the prospect of using and further developing this format.
5-Pull Core & Invasion Core

Those that watched Linker’s podcast were probably hoping for a legend for these icons. If this format is enjoyed and embraced by the community and guide-makers alike, the hope is to eventually use the icons in a more interactive way, via mouseover or tapping, to allow for descriptions of the marked mechanics and synergies. For example, Tidus is shown as functioning primarily as CC for the 5-pull core and as a smart-targeting hero on the invasion core. Anyone that runs Tidus on 5-pull knows that he can also carry even if other heroes die, so any icon can only tell half the story. For now, the icons represent one or two functions I’d most wish to highlight at a glance, but some, require much deeper explanation. I will focus here on explaining some of the less apparent synergies.
5-Pull Core
The 5-Pull Core has a familiar enough win condition that the description is probably unnecessary, but it also provides an opportunity to demonstrate what is meant by win condition. The core of Eironn, Skriath and Safiya result in the repositioning of all 5 enemies into Safiya’s pyramid zone where allies’ attacks are buffed while enemies’ attack and haste are debuffed. On top of the huge stat advantage swing, each of the three heroes are able to deal significant AOE damage, allowing for some flexibility around ally deaths. Usually, an Eironn ult is sufficient to signal a win.
A deeper analysis would include minimum levels of investment, enemies for which the core is weak (rosa) or strong (squishy physical enemies) and potentially which flex heroes (or alternatives) can be used to counterbalance weaknesses. However, this post is meant to be more introductory to the format and just a few of the cores I consider to be proven or show promise.
Notable Flex Synergies:
Flora & Khasos
When used with Khasos, Flora is given life leech to keep herself topped off in HP, resulting in more frequent and stronger damage/shielding birds. On top of this, her birds target a random enemy with a line attack, and by pulling all 5 enemies to the same location results in 5 hits, more HP returned from LL, and shields on slots 1, 2 and 4. A 3/3 Khasos, by receiving damage reduction for each surviving hero in the back line is able to take the majority of opening attacks and to make more efficient use of the barrage of flora shields. While enemies still prefer to attack Eironn, often killing him, Khasos is well prepared to take the brunt of attacks coming from enemies in Safiya zone. Flora also provides an unkillable backline resulting in a minimum of 22% damage reduction for Khasos. Fun fact, Eironn, Safiya, Skriath and Flora all have sources of AOE haste reduction.
Flora & Gorvo
Unlike Khasos, Gorvo is able to save Eironn, via barricade (if highest power), CC and tanking, thereby increasing the chances of Eironn ult. The new artifact can be used to increase Gorvo’s own damage and tankiness, while his ult’s damage reflection can achieve significant damage contribution. As a kicker, Gorvo’s bonus shielding (only applies to him, not allies) is a perfect complement to Flora’s shields, though the birds are not fired at the same rate as the Khasos alternative.
Invasion Core (Theoretical)
Skreg invade teams are not new. Skreg’s furniture enables a strong stat and energy advantage on the enemy side of the field, favoring heroes that push or dive into enemy territory. However, the stat advantage swig is not as big as fighting in a Safiya zone. At high power deficits, the damage reduction provided by Skreg is not sufficient on its own to create a win condition out of any set of invaders. The theoretical win conition here is instead proposed to be the opposite of 5-pull. Instead of clustering enemies on your side, you can instead make use of the space on the enemy side to split targets up, allowing for damage to be dispersed in a more manageable way. There is an interaction between Cecilia’s attack-lowering zone and Antandra’s highest-attack dive that should effectively allow for a choice between targets to attack and tank. If Cecilia dives onto the enemy with the highest attack, then Antandra will retarget her spear/dive to the second-highest attack target. A divide and conquer strategy is only as good as the ability to flex heroes to capitalize on the arrangement. Since Antandra’s dive is mostly position agnostic, she can be used to gang up on enemy heroes, leaving a capable (usually immunity-based) tank to deal with the heavier damage side. This allows the option to gang up on an opponent, such as diving the highest attack target with Ahtalia or using Estrilda/Skregg to shove an enemy into Cecilia’s zone. In addition to strong abilities to soak damage, there are multiple sources of energy advantage from which to choose. 9/9 Skreg grants 100 energy every 3 seconds to allies on the enemy side,+30 Antandra grants 60 energy to those attacking her marks (2 second CD), Estrilda grants energy through Inspire and passively when enemies are slain, and Cecilia grants teamwide energy and healing when one of her ult targets dies within 5 seconds.
The team really comes together with the addition of Lucretia, before which it is probably, at best, viable for 5th fight viability. Note that Lucretia has become a strong candidate for the second hero to gaze after Twins as recommended by Grub and many others. Having the same highest-attack targeting as Antandra allows for the two to dive the same hero regardless of placement, benefiting from one other’s enemy debuffs and applying strong damage pressure. With the full set of flex options, Lucretia and Antandra can be used to hyperstack on the same troublesome targets. Athalia opposite the highest attack enemy will result in a triple team, and if you want to get crazy with it, they will likely quickly trigger Tidus’ retargeting for a 4th. More balanced approaches show the power of Lucretia by setting up two flexible win conditions: Thanks to Lucretia’s natural boost in energy influx after her first ult, all sources begin to feed a bonus 50%, allowing for an early ramp toward her substantial buffs without relying on an early ally death. However, dare the enemy slay an ally, Lucretia accelerates her snowball, and though enemies are not clustered for her insta-cheese, she is instead set up to make use of her hunting skill advantages to outpace enemies while a fully developed Brutus’ immunity is extended as allies die. Estrilda can take on a more buff-and-die-early role to get the ball rolling quickly.
Again, this team is theoretical, and I will be testing it soon.
Ever since the release of Daimon, there has been the ongoing question of “who’s support is whom’s?” The answer? Flex it!
Sustain Core & Save Core
Sustain Core
Originally, I placed Ferael and Nara with Daimon, but upon pilfering Gwyneth’s comp for spare parts, there is much more flexibility achieved. Rowan is commonly used with Daimon for the energy battery for an early ult to get the blood shield snowball rolling (see my post on Daimon’s bloodshield and its attack cap of 700%). Where Rosa was the former queen of energy batteries, Raine now holds her in fierce competition. With her rework, Raine now grants 50% of the energy she gains from any source to her highest-power target. While Rosa’s is usually 1:1 in her energy gain to energy given, it is also feast or famine which does not assist Daimon well with sustaining his blood shield. Raine boosts him instantly to Rowan’s energy pot and assists in capping off his already swiftly filling energy bar after every ult. The magic also happens when Rowan ults since it can grant energy directly to Daimon directly and indirectly through Raine’s 50% funnel. During spikes when Raine receives energy pot along with her natural energy sources, I have seen Raine’s energy funnel, which triggers every 2 seconds, spike into the 400s. Raine also compensates for one of Daimon’s main weaknesses. While he is quite effective at dealing large chunks of damage, he can be pretty ineffectiveness at finishing low HP targets. Raine’s passive amplifies damage to low HP targets while using active skills and furniture to further increase damage pressure to the lowest HP target. Additionally, her ult grants the ally that scores the kill 100% crit chance and a huge energy battery. The win condition for the team is as simple as “have daimon ult quickly and often enough to maintain blood shield.” Usually, daimon can clean up three remaining enemies without assistance, but the damage pressure of four or more is usually enough to take down his blood shield and prevent its growth back to high numbers, ending his damage and tanking advantages.
Rosa – But why not have both? When able to stall long enough for frontline Rowan to ult, the addition of Rosa further accelerates the ult spam as well as greatly increasing the damage and shielding by increasing his attack. This results in quicker ults as well as needing fewer. Rosa also stuns and debuffs the enemy nearest daimon, a likely first-kill target.
Arthur – Low-Ascension-Brutus and Wukong are common stallers for front line and need little explanation. Arthur is a sound choice for accelerating energy, especially when funneled through Raine’s accelerated attacks. Enemies that require more than just front-line tanks benefit from flexing Ferael and Nara for general or precise control.
Mezoth/Daimon/Rowan – The changes to Mezoth made him the perfect front line soak for a Daimon comp. Not only is Mezoth naturally bulky, but his ult splits the damage he takes 50/50 with the target, all while controlling them, and executing them at the point at which Daimon would need an extra ult. Daimon is a master of leaving 5 heroes alive with less than 20% HP, and Mezoth now specializes in pentakills with back-to-back ults. Thanks 9/9! While Mezoth does steal the opening energy pot, what he does with it is truly nuts, opening with a huge cleave into ult, leaving the target to share in the initial burst of their own teammates. While Mezoth takes decreased damage himself due to this funneling effect, he will likely be burst below half HP, losing his CC immunity and a large chunk of his HP based defense… oh wait! Rowan’s healing pot instantly triggers returning him to nearly full HP along with all his HP-based buffs and funneling more damage to his target. Mezoth effectively adds another win condition that is uniquely suited and synergistic w/ Daimon’s own AOE chunk and stall mechanics.
Save Core
The fate of Izold without pocket Ferael and Nara has been settled. He is better than ever with the release of Silas and Barricade. Izold, much like Daimon, is a one-man win condition. The entirety of his core and most of his flex options simply capitalize on saving him if and when he needs it. Optimally, Izold is subjected to high, but non-lethal damage pressure to raise his own damage, ults and lands a kill. 90% of the time this results in a win even at the new power cap around 5x deficits. All that changes at these new deficits is that one must be more selective in what Izold tanks or compensate for it. At 4x deficits and usually around cap, Izold can survive in slot 1 if Hendrik is able to survive in slot 2 due to Hendrik’s 9/9 granting Izold a significant boost to his defense. As Izold takes damage, his damage is amplified, and if Silas is alive, so too does his healing. Already the highest self-healing hero in the game, an extra ~50% rate certainly cannot hurt. Add to this Silas own healing prowess and Izold must be dealt substantially more burst damage through higher defense and quickly replenishing health to take him down… more than once. Release the Barricades! Now, fatal blows are both prevented and replaced with a % HP shield behind which Izold will fully recover. This can be triggered individually for each Barricade you bring, and the 40% HP lost by the barricade user is quickly replenished by Silas directly or indirectly through boosted self-healing.
Oddly enough, Hendrik tanks best when he is either saving himself after spiking low or saving a backline ally from would-be death. Perhaps the easiest fights are those with high threats to individual hero slots, such as Athalia where Silas can be placed directly in her dive path. Hendrik instantly retreats and gains significant damage reduction while still able to save Izold with Barricade. A Silas that survives for 10 seconds is a Silas that ults, granting up to 10 seconds of immunity to his target, preferably Izold, as well as boosting their damage through his furniture. However, Izold is not the only good target. Simply giving Izold more time with a manageable influx of damage can quickly snowball into a win. What’s more, when Izold is unable to tank front-row damage, a common scenario is for Hendrik to dash to save Izold and Silas to then ult Hendrik. While Izold does not get the damage amplification, both Hendrik and Izold will be immune to damage for the duration.
Grez – The amount of death-saving redundancies on the team is staggering with just the core heroes. Grez is a fantastic flex to turn would-be-lethal magic damage into Izold’s tankable range whie bringing an extra barricade safety net. Grez’s new mechanics reduce his targets damage while substantially increasing his own. His shields and ult provide more survivability and stall while his strong self-healing capabilities granted by his SI are amplified by Silas’ own.
Mehira – The Hypogean defense bonus works well to boost the high defenses of Hendrik and Izold already boosted by his furniture. Even at elite, Mehira is equipped to take a few big blows without needing saving. Further developed, Mehira has a neat synergy with Silas, as her opening loss of HP sometimes (I haven’t verified the conditions) triggers the bonus healing from Silas, helping her not only top off more quickly, but also granting her more energy from her SI. Note that according to Shay’s testing, the energy gained from healing is limited to that coming from her SI effect of allies losing HP. The damage dealing and energy/haste granting from mehira and the strength of her ult need little explanation.
Alna – As if the comp needed anything more, Alna is effectively your overkill switch. Alna slot 1 with Hendrik slot 2 with Izold and Silas in the back… probably would not need a 5th hero. By securing Hendrik Immunity for the opening 10 seconds, the Hendrik save for backline cannot be broken, buying at least one backline hero time to ult, which if Silas, is a source of immunity for another 10 seconds. Redundancies for your redundancies. To make matters worse for your enemies, Alna becomes much harder to kill through Hendrik’s bonus defense and Silas’ bonus healing. In fact, because Alna’s healing is based on the damage she receives, her boosted healing nets her more incoming healing than the damage she takes. In the end, Alna is probably wasted on savecore just to boost consistency in a meta that no longer requires it.
Wilder & Portal Core
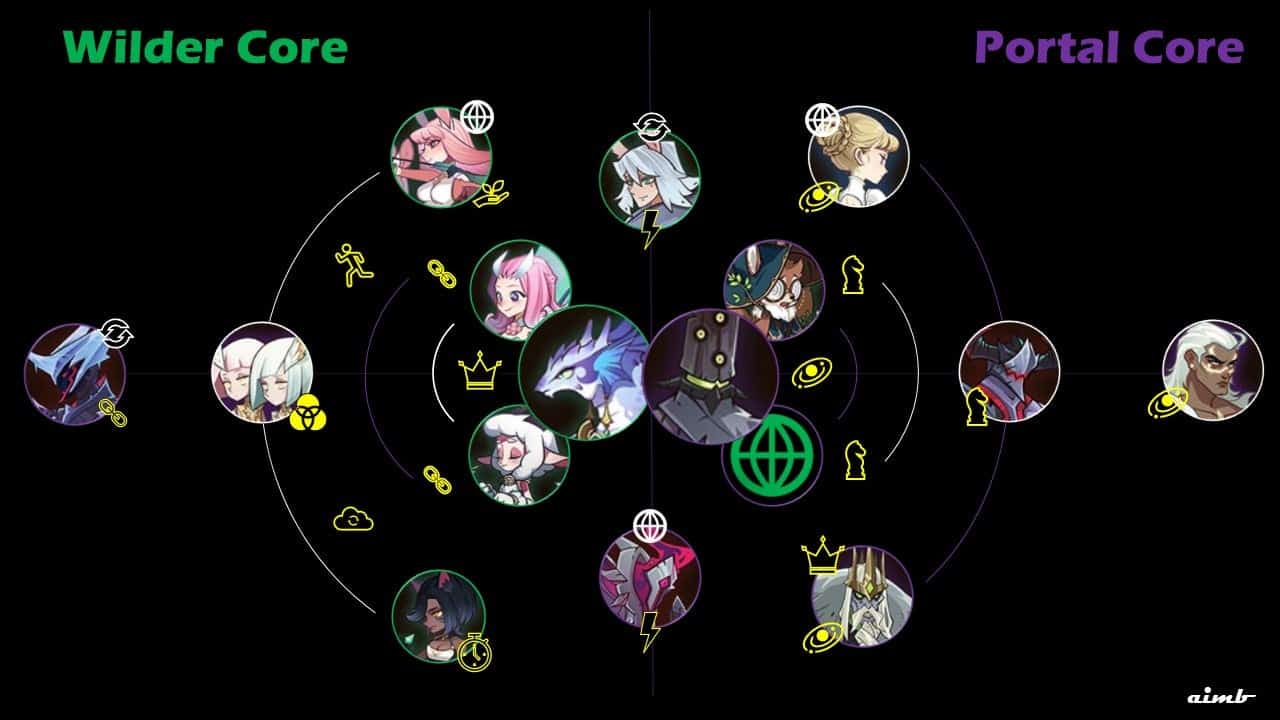
Let’s start this set with the familiar, simple Wilder core. The win condition is pretty straight-forward: stall until Tasi can ult so that Saurus can stack his buffs, heal the team to full and land one or two kills. Lyca and twins are a good way to rush this process, while Kaz, when fully developed, can be used as one of the highest-ceiling stall units in the game. Nemora is notably a niche answer to many troublesome enemies like Satrana, Mehira, Safiya, Rosa, etc., until 9/9 when she becomes one of the most broken heroes in the game. From stealing enemy front-line Lorsan links to turning Athalia on her own team, she tilts the beginning of fights heavily in your favor. The one downside is that the bonus attack of charmed heroes can result in Tasi banishing them.
One of the first things that is likely to jump out in Portal Core is the categorization of Gwyneth and Thoran as flex heroes. The reasoning for not forming cores around these common carries are the same on one hand and opposites on the other. From the perspective of a build path, the two heroes are incredibly inflexible. From the perspective of “endgame” comps, Thoran is likely to be used as the primary win condition in a very similar manner as he is currently used in the meta. Gwyn now struggles to find her place among the ever-increasing pool of carries competing for slots in 5x multifights. There is also much to be said for salvaging members of Gwyn’s typical entourage.
Now let me take a moment to dispel a common illusion created by Thoran cheese: that “Thoran is good at pushing power cap.” This remains true super early and upon reaching multifights, but it is *not* true midgame except in a deceptive sense. Yes, Thoran is a permanent mainstay of lowest power replays, but remember that the heroes with him are underdeveloped, which is his main value proposition upon reaching multifights. However this also forces a low value choice between investing in his entourage (kelthur, lorsan, etc) just to gain access to power-capped stages, or to try to use other developed heroes with him, usually to lesser effect. Yes, Thoran works with 5-pull, but from the perspective of a new player, 5-pull is not guaranteed by the time it is needed (skriath must be ascended and 3/3 for example).
Portal core effectively solves this problem thanks to the oden buffs that have turned him into *the most flexible hypercarry in the game.* In this context, high investment Thoran can make good use of low investment Oden while high investment Oden can also make good use of low investment Thoran. The overall formula is improved by high investments in both as the win conditions are complementary. Oden’s win condition is simply cluster and control while his damage ramps rapidly. Fortunately, as his damage ramps, so too does his ability to cluster and control. While controlled opponents cannot deal damage to Thoran during his ult, it does provide windows for him to build energy to get his ult off in the first place. The high amounts of damage oden is able to achieve also lower the need for Thoran’s reflected damage to land the kills. On the flip side, a Thoran that simply survives to ult is likely one that has kept enemies clustered long enough for oden to kill them without significant assistance.
So why is Thoran not simply the third hero in portal core? This is mainly a choice to highlight the true power of Oden and Pippa when used together. Both heroes individually have two different “modes.” Pippa has teammate teleport + immunity mode enabled by her +20, and she has an opening, frontline-enemy port when used in slot 4. Oden’s two modes are based on artifact. He typically uses Call to port the other frontline enemy or Windbinder to open his first eye, which delays the teleport and retargeting it to one of the undamaged enemies (typically backline) with the added effect of the stun. The interactivity between just the two of them is simple enough to understand with a little bit of practice, but the possibilities for any given team and vs any given stage are just staggering. One of my favorite tricks is enabled using a 9/9 Ezizh. If Pippa is placed behind Ezizh, he is hurled to the other side of the map, targeting the opposite corner, commonly Kelthur swapped or Nara pulled near Thoran. Ezizh will then gaze the furthest enemy in the front and back lines, which if oden uses Windbinder, is usually the two heroes left in positions to threaten Pippa who no longer has a front-line defense. The travel time alone makes for great CC, and the result is a nicely clustered group of enemies around Thoran.
Not only are the portal core duo viable for heavy investment, but they can make use of more heroes as carries than any other combo. Even better, they can flex well onto all five of the other cores. For 5-pull, Pippa can teleport a frontline ally on top of the cluster of enemies, achieving a Gorvo-like opening CC effect while oden can beat certain problem enemies to the punch by teleporting them before their opening skills complete. He also assists in compensating for one of the core’s main weaknesses: how much energy enemies receive from receiving so many hits. Oden’s 3/3 cuts into their energy gain dramatically, and his ult neutralizes the earliest ult threat. For invade, Pippa and Oden can be used to immediately port the frontline enemies into a cluster on the back line, allowing allies to engage deep in enemy territory, or Pippa can be used to teleport nonconventional invade heroes to the enemy side, (Drez, Thoran, Saurus, etc.) or to send Brutus to tank a cluster with 5 extra seconds of immunity while Skreg’s Ironjaw summon helps protect Pippa from being invaded herself. For sustain core, the battlefield can be rearranged to tilt threats away from Rowan and Daimon. For save core, Izold can be ported into more friendly environs or have his path cleared to 1v1 an enemy in slots 3 or 5. Lastly, Pippa gives Wilder core a second Tasi ult and the duo’s battlefield manipulation provides more ways to reach these ults.
In “final form” with Khazard, Portal and Wilder cores can be mixed and matched to quickly achieve close to 100% CC uptime on enemies, forming one of the strongest comps in the game for enemies without anti-CC kits.